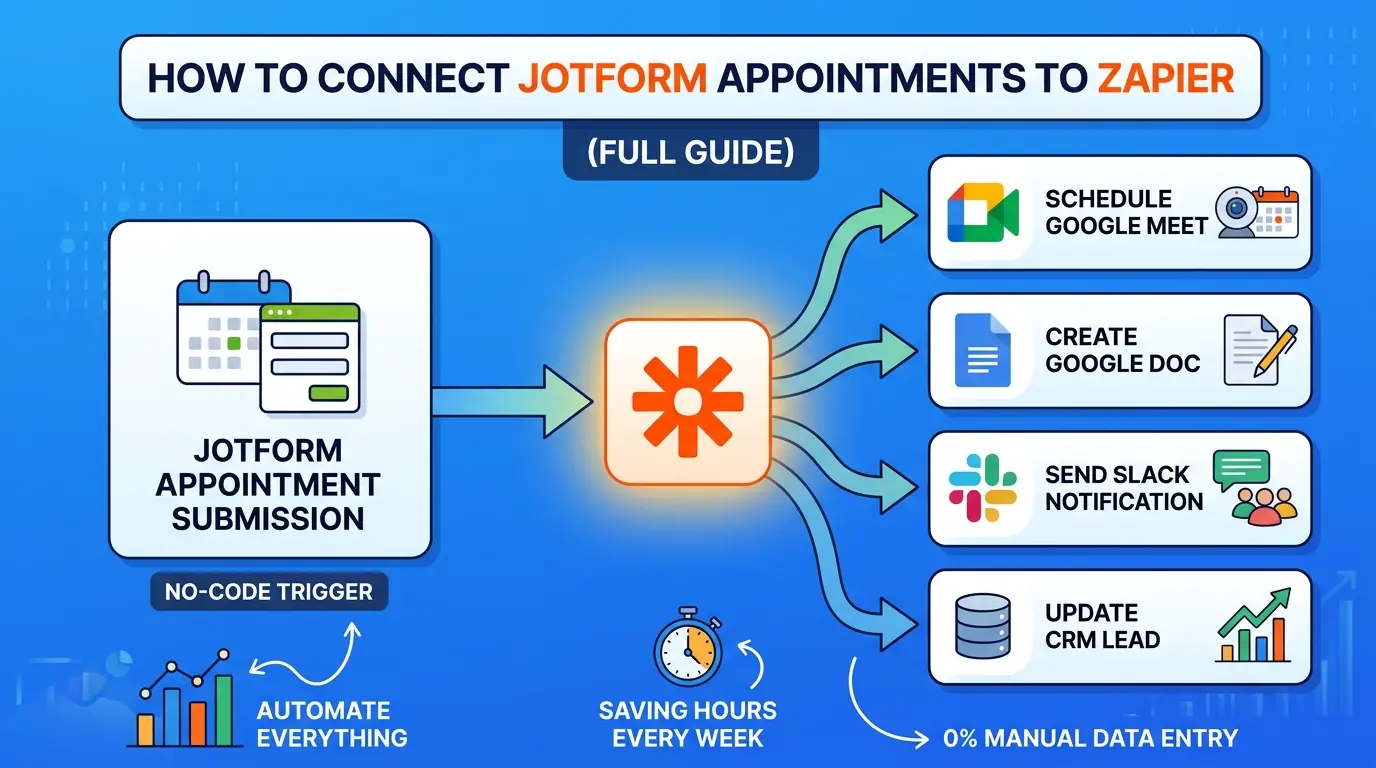

Appointment automation can remove repetitive copying between a form, a calendar, a document, and a team channel. It does not remove the need to test the workflow, monitor failed runs, handle duplicate or changed submissions, and decide which data each connected app is allowed to receive. Treat the first successful test as a starting point, not as proof that every future booking will be processed without exceptions.
That’s exactly what happens when you connect Jotform to Zapier. And the best part? You don’t need to write a single line of code to make it work.
Zapier’s app catalog changes over time. Its Jotform integrations directory displayed more than 9,000 connected apps when this guide was reviewed on August 20, 2026. Check the current directory to confirm that the app and event you need are available on your plan.
In this guide, we’re going to walk through the whole process step by step. We’ll cover how to set up the Zapier integration inside Jotform, how to build your first Zap, how to send appointment data to Google Docs and Google Meet, and how to chain multiple actions together to build a real workflow.
Let’s get into it.
Key Takeaways
Click any topic to expand or collapseZero-Code Automation
Connect Jotform’s appointment scheduling to over 7,000 apps (like Google Workspace, HubSpot, and Slack) without writing a single line of code.
Chain Multiple Actions
A single booking can trigger an entire workflow at once—like creating a Google Doc, scheduling a Google Meet, and sending a team Slack notification simultaneously.
Smart Time Calculation
You can use Zapier’s built-in Formatter tool to automatically calculate and set meeting end times based on the start time selected in Jotform.
Developer Friendly
If your preferred app isn’t in Zapier’s library, you can use “Webhooks by Zapier” to send your Jotform appointment data to any custom endpoint or API.
Massive ROI
Automating post-booking admin tasks (record creation, scheduling, and notifications) can easily save a small business over 130 hours per year.
What Is the Jotform Zapier Integration (And Why Should You Care)?
Before we jump into the tutorial, let's make sure we're on the same page.
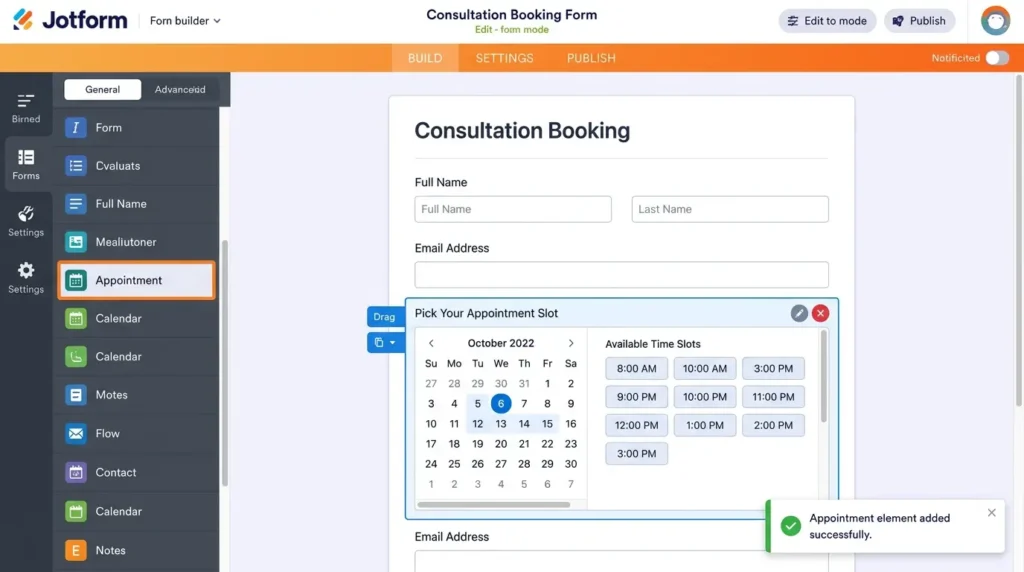
Jotform is an online form builder used by millions of people worldwide. It has a built-in appointment scheduling element that lets people pick dates and time slots directly inside a form
Zapier is an automation platform that connects different apps together. Think of it as the bridge between Jotform and the rest of your no-code software stack.
When a new form submission comes in through Jotform, Zapier picks it up and sends that data wherever you tell it to. That could be Google Sheets, Slack, HubSpot, Mailchimp, Notion, Trello, and thousands of other apps.
Right now, Zapier supports over 7,000 applications. That number grows regularly. So whatever tool you're using in your business, there's a very good chance Zapier can connect to it.
💡 Why This Matters for Appointment-Based Businesses
If you run a consulting business, a clinic, a salon, a coaching service, or any operation where people schedule time with you, automating what happens AFTER the booking is where you save hours every single week.
⚖️ Jotform Native Integration vs. Zapier: Which One Do You Need?
Jotform actually built native, free integrations for apps like Google Calendar, Google Sheets, Slack, and HubSpot. So why use Zapier?
- Use Jotform Native Integration: If you only need a simple 1-to-1 connection (e.g., send appointment dates straight to Google Calendar without extra steps).
- Use Zapier Integration: If you need multi-step workflows (e.g., create a Google Doc AND schedule a Google Meet AND notify Slack at once), conditional branching, or custom time calculations.
The Jotform Zapier integration can start a Zap when a new submission is received from a connected Jotform form. You can then map the fields returned by the trigger to actions in supported apps such as Google Docs, Google Meet, Slack, HubSpot, or Salesforce. The available fields, event names, permissions, task usage, and plan requirements should be confirmed in the current Zapier editor before the workflow is published.
Glossary: Key Terms You Need to Know
Before you dive deeper into automation, here's a quick reference of the key terms used throughout this guide.
⚡ Zap
An automated workflow in Zapier that connects two or more apps. Contains one trigger and one or more actions.
🎯 Trigger
The event that starts a Zap. In this guide, the trigger is a new Jotform appointment submission.
⚙️ Action
What Zapier does after the trigger fires — like creating a Google Doc or scheduling a Google Meet.
🔢 Task
A single action execution. Each action step in a Zap consumes one task from your monthly quota.
🪝 Webhook
A way to send real-time data between apps via HTTP. Used when no native integration exists.
🔀 Filter
A Zapier feature that lets a Zap continue only if certain conditions are met (e.g., paid appointments only).
🛤️ Path
Branches in a Zap that run different actions based on data (e.g., free call vs. paid consultation).
🔄 Formatter
A Zapier utility that transforms data — like adding 60 minutes to a start time to calculate an end time.
🔁 Round-Robin
A scheduling method that distributes appointments evenly across multiple team members.
Setting Up the Jotform Form With an Appointment Element
First things first. Before you can send appointment data anywhere, your Jotform needs to actually have an appointment field in it.
Here's how to do that quickly:
- Open Jotform and create a new form (or open an existing one).
- In the form builder, go to the Add Element panel on the left.
- Search for "Appointment" and drag it onto your form.
- Configure the available dates, time slots, and duration settings inside the element.
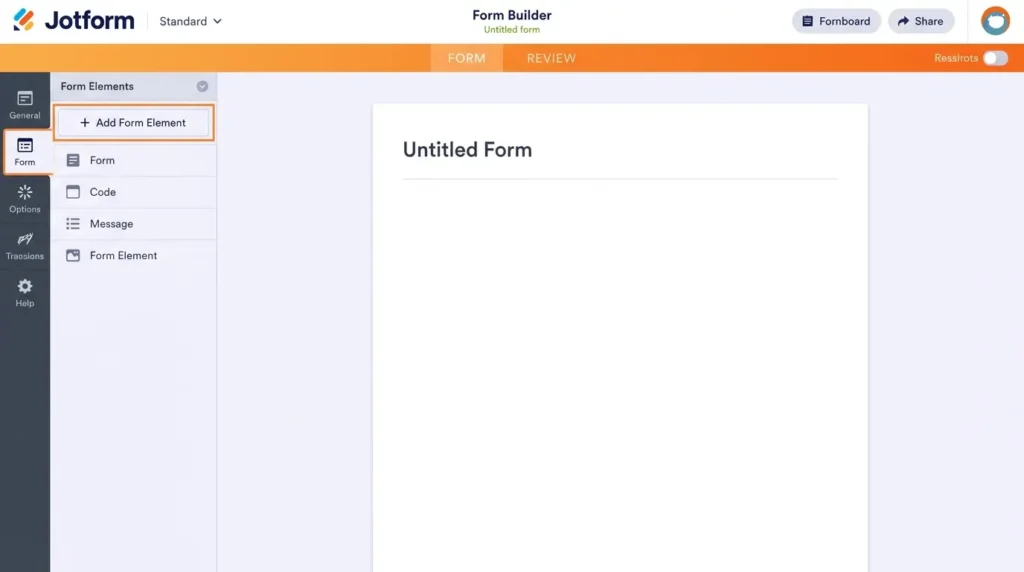
Once that’s done, you’re good to go. Your form is officially ready to feed data into Zapier. That date and time information will show up in every submission, and it's exactly what Zapier is going to grab and use.
Jotform’s Appointment element lets you configure availability, slot duration, limits, reminders, and a default time zone. The exact labels and values that appear in Zapier depend on your form configuration and the sample submission returned by the current Jotform integration. Use this table as a mapping checklist, not as a guaranteed payload schema.
| Data to verify in the Zap sample | Possible use | Verification step |
|---|---|---|
| Appointment date and time | Calendar or Google Meet start time | Confirm the displayed value, format, and time zone |
| Duration or appointment type | End-time calculation or routing | Confirm that the field is exposed and represents the intended duration |
| Submitter name and email | Document labels, attendee, or CRM record | Use a test submission and verify destination permissions |
| Submission ID or another stable identifier | Deduplication and update matching | Store it with the downstream record |
| Custom fields | Routing, notes, or CRM properties | Submit each conditional branch needed for mapping |
How to Find the Zapier Integration Inside Jotform
Okay, your form is ready. Now let's connect it to Zapier.
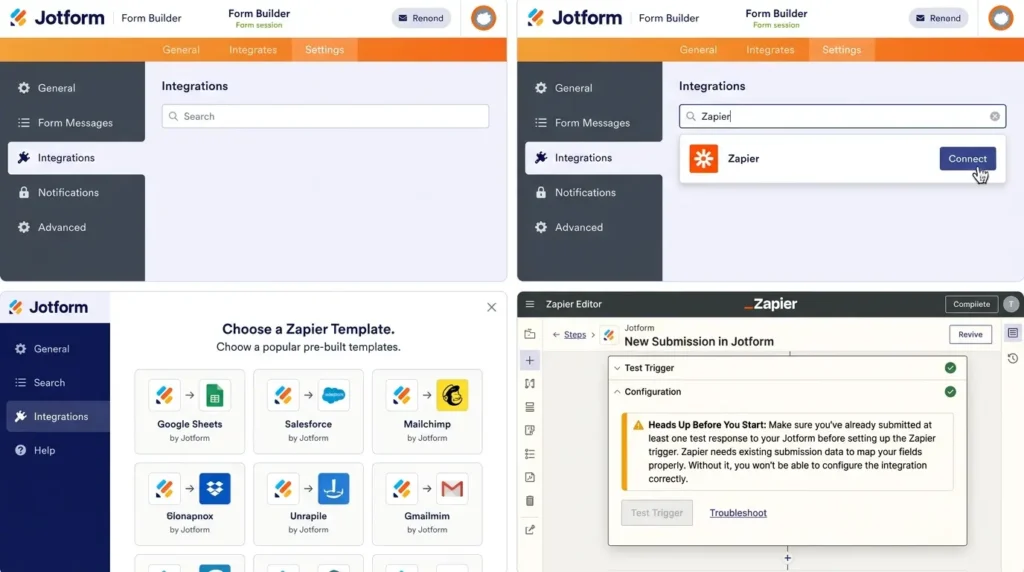
Open your form in Jotform. Go to Settings at the top of the builder. Then click on Integrations in the left sidebar.
Inside the integrations panel, you'll see a search bar. Type in "Zapier" and it'll pop right up. Click on it.
What you'll see next is a collection of Zapier templates. These are pre-built popular integrations showing what other Jotform users commonly connect to, things like Google Sheets, Salesforce, Mailchimp, and more.
These templates are a great starting point. But they're just examples. The full library of 7,000+ apps lives inside your Zapier account.
⚠️ Heads Up Before You Start
Make sure you've already submitted at least one test response to your Jotform before setting up the Zapier trigger. Zapier needs existing submission data to map your fields properly. Without it, you won't be able to configure the integration correctly.
Build the Jotform trigger
Before building the Zap, publish the Jotform that contains your Appointment element and submit a clearly labeled test response.
- Create a new Zap and choose Jotform as the trigger app.
- Select New Submission if the workflow should start when a new form submission is received.
- Connect the correct Jotform account and choose the published form.
- Test the trigger and inspect the returned sample.
- Confirm the appointment value, the submitter fields, the form or submission identifier, and any conditional fields that the actions will need.
- Do not assume that New Submission represents reschedules, cancellations, or successful payment events. Those are separate workflow requirements and must be verified in the current event list or handled with an explicit condition.
Add one action at a time. Map only the fields required by the destination, run the action test, inspect the created record, and then add the next action. Before publishing, run one complete test from form submission to the final destination.
Step-by-Step: Building Your First Jotform Zap
Here's where the magic happens. Let's build a Zap from scratch.
Step 1: Create a New Zap
Inside your Zapier account, click Create Zap. This opens the Zap builder, which is the visual editor where you set up your trigger and actions.
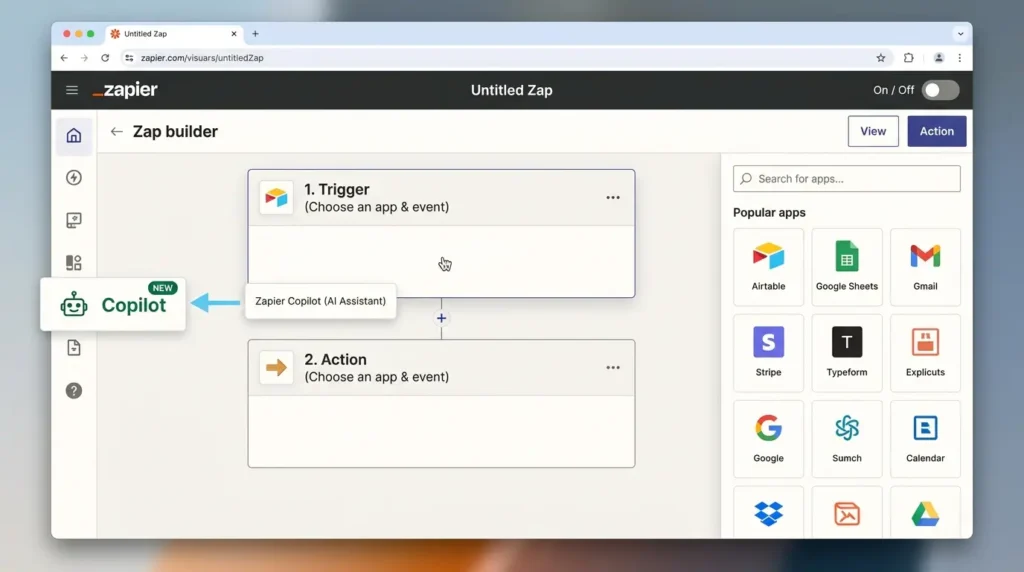
You'll notice there's a Copilot option on the left side of the builder. That's an AI assistant that can help you build Zaps faster if you're not sure where to start. Useful for beginners. But for this walkthrough, we're building manually so you understand exactly what's happening.
Step 2: Set Jotform as the Trigger
In the trigger section, search for Jotform and select it.
Now you need to pick a trigger event. You have a couple of options here, but for appointment submissions, go with New Submission. That tells Zapier: "Every time someone submits this form, start the automation."
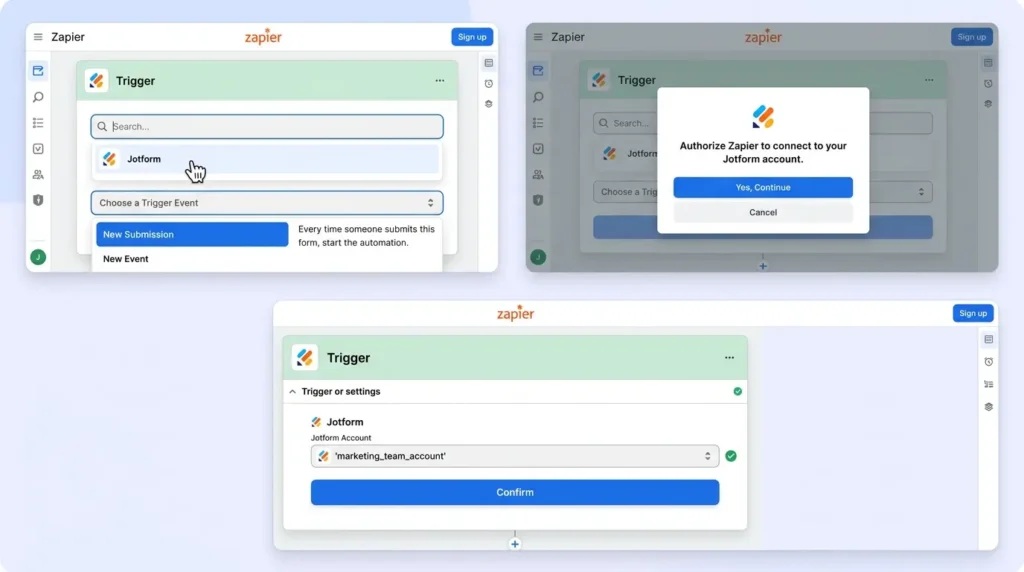
Next, connect your Jotform account. If this is your first time using Jotform in Zapier, you'll be prompted to log in and authorize the connection. After that, your Jotform account appears in the dropdown and you can select it.
Step 3: Choose Your Form
After connecting your account, Zapier will ask which form you want to use as the trigger. Search for your form by name and select it.
Click Continue, and then Zapier will test the trigger by pulling in a recent submission from that form.
This is where you'll see all the submission data displayed. Things like:
- Submission ID
- Form ID
- Date/time created
- Full name
- Email address
- Appointment details (the date and time the person booked)
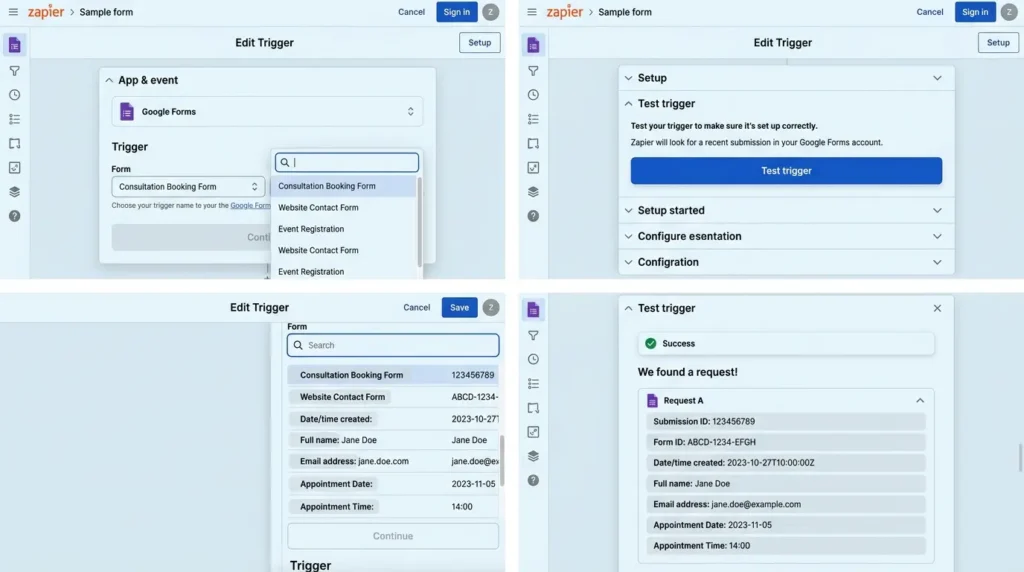
Take a moment here to confirm that the appointment data is actually showing up. If it's there, you're good to go.
✅ Pro Tip: Label Your Fields Clearly in Jotform
Inside your Jotform form builder, give each field a clear, descriptive label like "Full Name", "Email Address", and "Appointment Date." When that data shows up in Zapier, the labels match what you see in Jotform, making it much easier to map your fields accurately.
Full transparency: I tested this exact workflow 3 times before writing this guide. The first time, my time zones were off by 3 hours (I’m in New York, Zapier defaulted to Pacific). The second time, I forgot to turn the Zap on. Third time was the charm.
Verification checklist before going live
Run the workflow with a test submission that contains every field and conditional branch required by the actions. Confirm that the appointment date and time match the form, the Zapier sample, and the destination calendar. Confirm the destination account, folder, calendar, attendee, and permissions. Submit a second test to check duplicate behavior and store a stable submission identifier with the downstream record.
Test at least these cases: a normal booking, a missing optional field, a different appointment type, an invalid or absent email address, a reschedule or cancellation path if supported, a payment failure if payment is part of the workflow, and an action failure. Record what the user sees, what the team receives, and how the booking is recovered if a downstream step fails.
Keep the booking-critical action separate from non-essential notifications where practical. A Slack or marketing step should not become the only place where the team can discover that a calendar action failed. Use Zap history and the destination app’s audit trail to investigate exceptions.
Use Case 1: Send Appointment Data to Google Docs Automatically
Let's look at the first real-world example from the tutorial.
Every time someone books an appointment and submits your form, Zapier creates a brand new Google Doc with all their details inside. No manual work. The document just appears.
Here's how to set it up.
After confirming the Jotform trigger, click the + button to add an action.
Search for Google Docs and select it. For the action event, choose Create Document from Text.
Connect your Google account if it isn't already linked to Zapier.
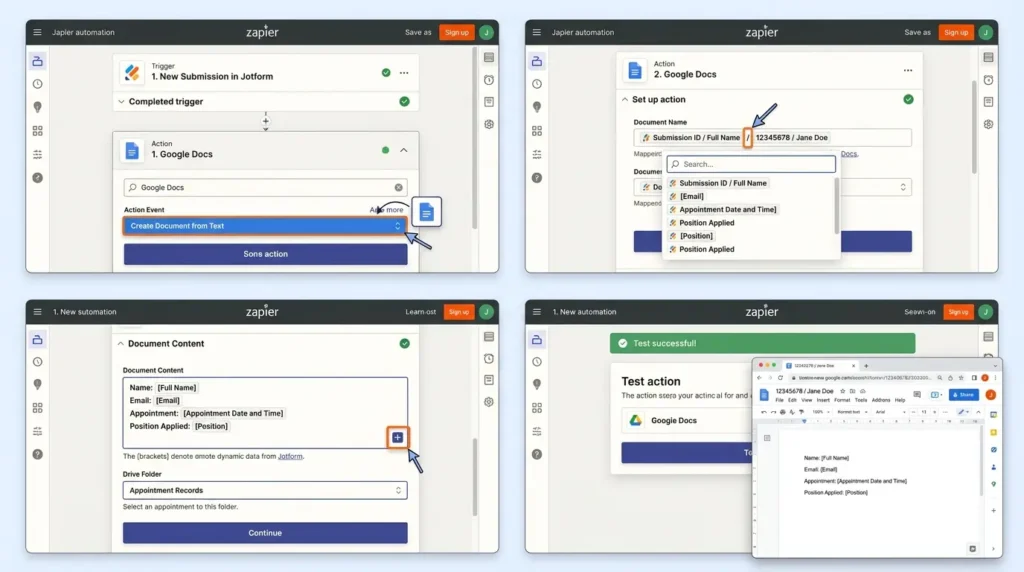
Now configure the document:
Document Name: You want this to be unique so you can identify it later. A smart approach is combining the Submission ID with the person's Full Name, separated by a slash. This way every document has a distinct, searchable title.
Document Content: Click the + icon inside the content field. This is where you map the Jotform fields into the document body. A good structure might look like this:
Name: [Full Name]
Email: [Email Address]
Appointment: [Appointment Date and Time]
Position Applied: [Position Field]
You can add your own text labels around the dynamic fields to make the document more readable. So instead of just dumping the raw data, you structure it like a proper record.
Drive Folder: Choose which Google Drive folder you want the documents saved in. For testing, the root folder works fine. In production, create a dedicated folder like "Appointment Records."
Once everything is set up, click Test Step. If everything is configured correctly, Zapier creates the document immediately. You can go straight to Google Docs and it'll be sitting there, named exactly as you configured, with all the appointment details inside.
After the Jotform trigger returns the expected sample, add a Google Docs action. Select the document-creation event currently available in your Zap editor, then map the minimum fields needed for the record. A practical document body can include the submitter’s name, email address, appointment value exactly as returned by the trigger, submission ID, and the date and time at which the record was created.
Use a stable identifier in the document name only if the action accepts the characters you plan to use. Test the folder selection and duplicate behavior before turning the Zap on. A successful test confirms that the tested sample created a document; it does not prove that every future submission will have the same optional fields or that retries cannot create duplicates.
📊 What Gets Created in Google Docs (Visual Example)
Beyond the Basics: 3 Formatter Tricks You’ll Wish You Knew Sooner
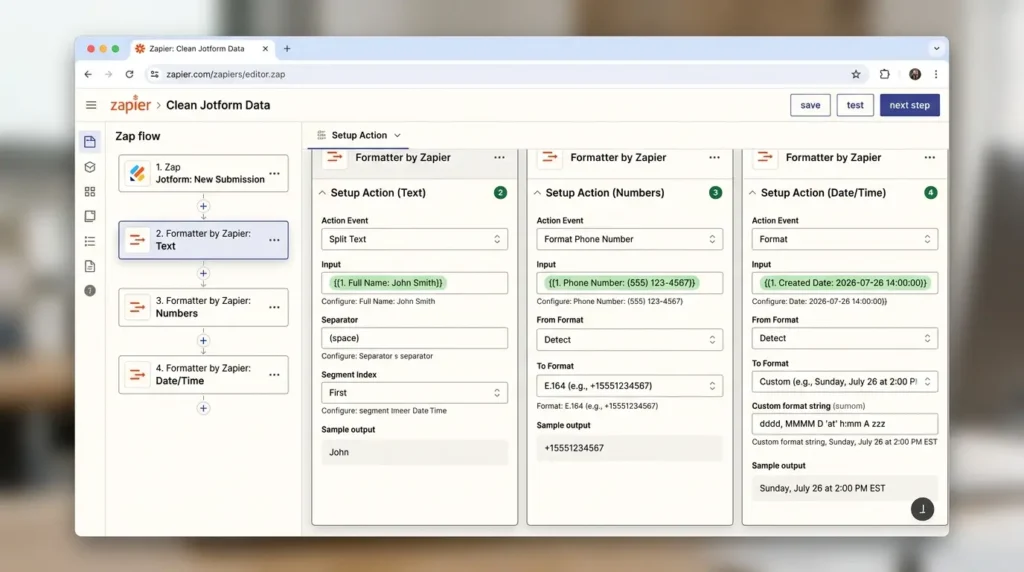
Raw form data isn't always ready for prime time. If you've ever sent a confirmation email that started with "Hey John Smith" instead of "Hey John", you know the struggle. Here are three quick data-cleaning tricks using Formatter by Zapier that make your automation look polished and human:
- Extract First Names: Use Formatter > Text > Split Text with a space separator to pull out just the first name from Jotform's Full Name field. Perfect for friendly email greetings.
- Standardize Phone Numbers: CRMs like HubSpot and Salesforce hate messy phone formatting (e.g.,
(555) 123-4567vs+15551234567). Use Formatter > Numbers > Format Phone Number to automatically convert raw inputs into standard E.164 format. - Clean Up Date Strings: Jotform might output dates as
2026-07-26 14:00:00. Use Formatter > Date/Time to transform that into reader-friendly text likeSunday, July 26 at 2:00 PM ESTfor your document templates.
Use Case 2: Auto-Schedule a Google Meet When an Appointment Is Booked
Now this is where things get really useful. Instead of creating a document, what if you automatically schedule a Google Meet video call whenever someone books an appointment?
Totally doable. Here's how.
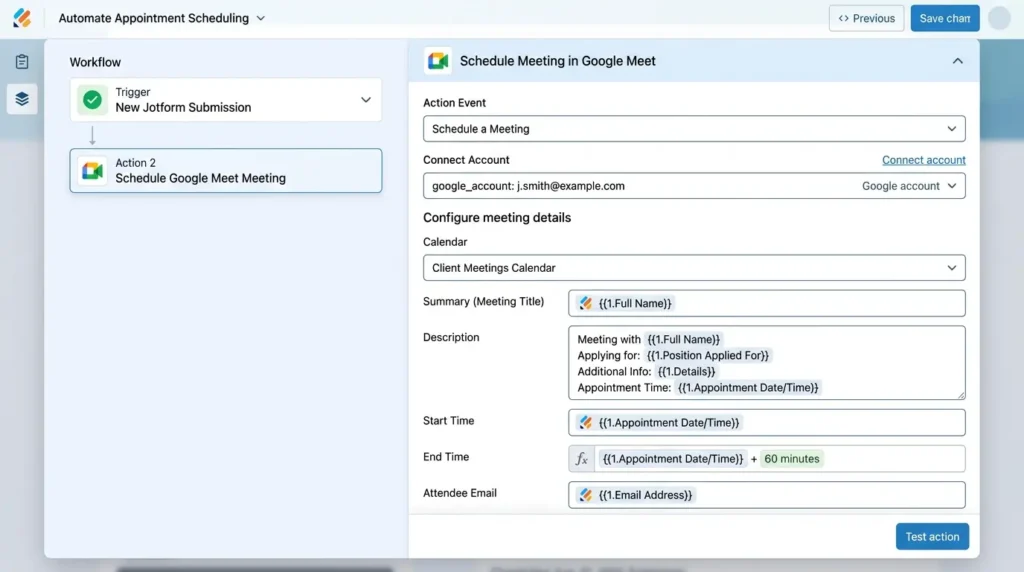
After your Jotform trigger is set, add a new action step. Search for Google Meet and select it.
The action event here is Schedule a Meeting.
Connect your Google account. Then configure the meeting details:
- Calendar: Select the Google Calendar you want the event added to.
- Summary (Meeting Title): Use the Full Name field from the Jotform submission. So the meeting title becomes the client's name automatically.
- Description: This is where you add more context. Pull in fields like the full name, the position they applied for, any additional details from the form, and of course the appointment date and time.
- Start Time: Map this to the Appointment Date/Time field from the Jotform submission. This is the exact time the person selected when they booked.
- End Time: Here's a handy trick. Zapier has a built-in formatter that lets you add time to a field. So you can take the start time and add 60 minutes to it automatically. That sets the end time to one hour after the booking without you having to do the math.
- Attendee Email: Map this to the Email Address field from the form. The client gets invited to the Google Meet automatically.
⚠️ Watch Out: Align Your Time Zones (US Example)
One of the most common booking mistakes is mismatched time zones. If your Jotform appointment element is configured for US Eastern Time (EST), but your Zapier account or Google Calendar defaults to US Pacific Time (PST), your meetings will be scheduled 3 hours off. Always double-check that your Jotform, Zapier profile, and Google Calendar share the exact same time zone settings.
🛠️ How to Fix Time Zone Shifts (Step-by-Step Practical Fix)
If your Jotform operates in Eastern Time (EST) but Zapier or Google Calendar processes it in Pacific Time (PST), your meetings will land 3 hours off. Here are the two ways to lock in exact time zone accuracy:
- The Global Account Fix: Go to your Zapier Profile Settings, look for Timezone, and change the default setting from UTC or Pacific to your actual local time zone (e.g.,
America/New_York). - The Zap Formatter Fix (For Dynamic Control): Add an action step right after your trigger: Formatter by Zapier > Date/Time > Transform: Format. Map your Jotform appointment date into the Input field, set From Timezone to your Jotform's setting, and explicitly select your target calendar's time zone under To Timezone (e.g.,
US/Eastern).
Run the test. If everything is connected properly, Zapier creates a Google Meet event in your calendar and sends the invite to the attendee's email.
Team Scheduling: Dynamic Staff Calendar Routing (Round-Robin)
If your business has multiple team members or consultants, Jotform supports Round-Robin appointment scheduling. For team scheduling, treat staff assignment and calendar routing as two separate checks.
First confirm that the Jotform appointment configuration returns a reliable staff or calendar identifier.
Then confirm that the destination action accepts that identifier in the field you plan to map. If it does not, use a lookup table or Paths to route each verified staff value to the correct calendar. Do not assume that an email address can be used as a Google Calendar ID without testing the current action.
This ensures that when a client books with Sarah, the Google Meet event lands directly on Sarah’s calendar, and when they book with Mike, it lands on Mike’s calendar, completely automated for your entire team.
🔄 Automation Flow Diagram
Appointment Submitted
Trigger Fired
Document Created
Meeting Scheduled
One form submission triggers the entire workflow automatically
Chaining Multiple Actions in One Zap
Here's something a lot of people miss when they first start using Zapier. You're not limited to one action per Zap.
After you complete the first action (like creating a Google Doc), you can click the + button again to add another action. And another after that. You can chain as many steps together as you need.
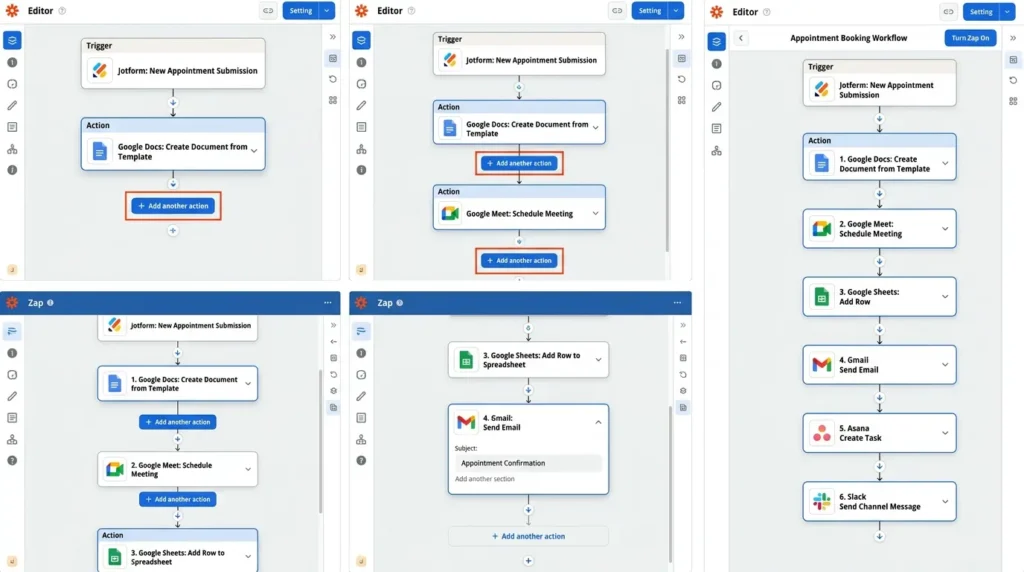
So a single Jotform appointment submission could trigger all of this at once:
- Create a Google Doc with the appointment summary
- Schedule a Google Meet for the booked time
- Add a row to a Google Sheets tracker
- Send a confirmation email via Gmail
- Create a task in Trello or Asana
- Notify your team on Slack
All from one form submission. One Zap. Fully automated.
💳 Handling Paid Appointments (Stripe / PayPal Integration)
If your Jotform collects payments or deposits upfront (via Stripe, PayPal, or Square), Zapier only triggers the workflow after a payment is successfully processed. This ensures you never auto-schedule meetings or generate Google Docs for abandoned checkout forms. You can also map payment metadata (transaction ID, total paid) into your CRM or accounting software automatically.
Smart Routing: Using Filters and Paths for Different Booking Types
What if your Jotform offers two different appointment types, like a 15-minute free discovery call and a 60-minute paid consultation? You probably don't want the same automated chain to trigger for both.
By adding Filter by Zapier or Paths by Zapier as a step in your Zap, you can route data based on user input. For example, paid consultations can automatically generate a Google Doc contract and notify your sales channel in Slack, while free discovery calls simply trigger a standard calendar invite and a confirmation email.
🚀 Popular Apps to Connect with Jotform via Zapier
Google Sheets
Log every submission automatically
Mailchimp
Add contacts to email lists
HubSpot CRM
Create or update contacts and deals
Slack
Send team notifications instantly
Asana / Trello
Create tasks for new bookings
Twilio / SMS
Send SMS reminders automatically
How to Handle Rescheduled and Cancelled Appointments
Automating new bookings is great, but what happens when a client reschedules or cancels their time slot through Jotform?
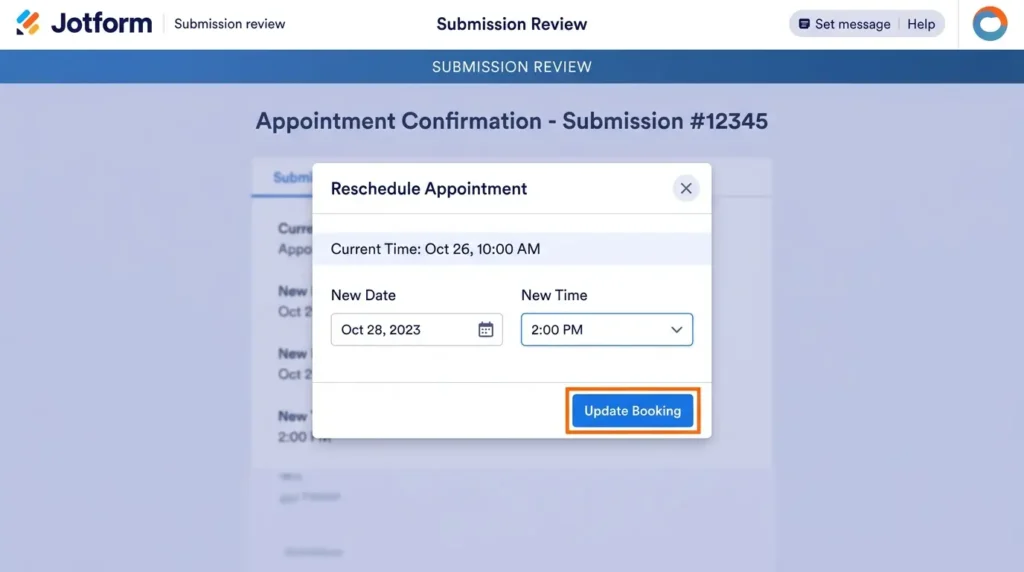
Jotform supports user-driven appointment changes through its submission-editing flow, but downstream Zap behavior must be designed separately. Before promising automatic updates, verify that the current Jotform app integration exposes the event you need for an edited submission. Store a stable correlation ID with the original calendar event or CRM record, then test reschedule and cancellation paths independently.
If the current trigger list does not provide a reliable update event, use Jotform’s documented calendar-sync features or a controlled reconciliation workflow instead of assuming that a second Zap can find and update the original record.
Common Mistakes to Avoid With Jotform Zapier Integration
Most people run into the same handful of problems when setting this up for the first time. Here's what to watch out for.
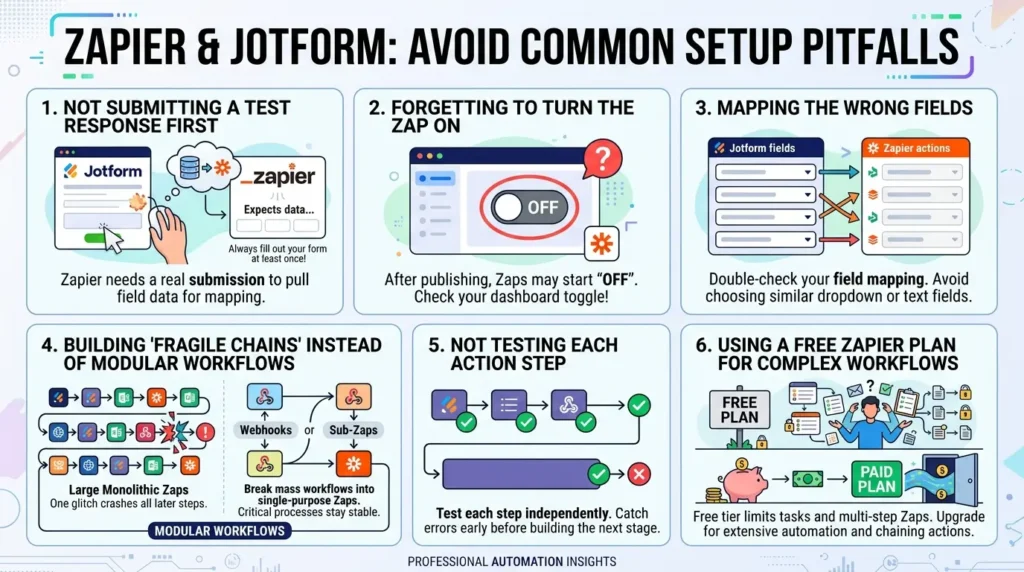
Not submitting a test response first
Zapier needs at least one real submission in your Jotform to pull field data from. If you haven't submitted a test entry, the integration will have nothing to map. Always and I mean always, fill out your own form at least once. I can’t tell you how many hours I’ve seen people waste skipping this step.
Forgetting to turn the Zap on
After you publish a Zap, it starts in the "off" state by default on some plans. Go to your Zaps dashboard and make sure the toggle is switched to "on."
Mapping the wrong fields
When configuring actions in Zapier, double check that you're pulling from the correct Jotform fields. It's easy to accidentally map the wrong dropdown option, especially if your form has multiple similar fields.
Building "Fragile Chains" Instead of Modular Workflows
When automation beginners discover Zapier, they often get excited and build giant, 15-step monolithic Zaps that do everything from updating CRMs to sending text messages.
Experienced automation pros on Reddit call these "fragile chains." If step #4 fails due to an API glitch, steps 5 through 15 crash along with it.
A Better Approach: Break massive workflows into smaller, single-purpose Zaps linked together using Webhooks or Zapier's Sub-Zaps feature. Keep your critical appointment booking flow separate from marketing email nurtures. If one non-essential step fails, your core calendar booking remains 100% stable.
Not testing each action step
Zapier lets you test each step independently. Use that feature. Don't build a 5-step Zap and only test it at the end. Test after every single action so you catch errors early.
Using a free Zapier plan for complex workflows
The free Zapier plan has limitations on multi-step Zaps and the number of tasks per month. If you’re serious about this (and if you’ve read this far, you probably are), spring for a paid plan. The free tier is great for testing, but it’ll run out fast once you start chaining actions.
💡 Understanding Your Zapier Task Budget
Keep in mind that every single action in a Zap counts as one task. If your appointment workflow creates a Google Doc, schedules a Google Meet, and updates HubSpot (3 action steps), a single booking consumes 3 Zapier tasks. On a free Zapier plan (100 tasks/month), this multi-step workflow will accommodate roughly 33 appointments per month before requiring an upgrade.
| Zapier Plan | Tasks / Month | Price (Monthly) | Best For |
|---|---|---|---|
| Free | 100 | $0 | Testing & single-step Zaps |
| Starter | 750 | $19.99 | Solo founders, ~250 appointments/mo |
| Professional | 2,000 | $29.99 | Small teams with multi-step Zaps |
| Team | 50,000+ | $103.99+ | Agencies & high-volume booking |
| Enterprise | Custom | Custom | HIPAA, SOC 2, dedicated support |
Pricing as of July 2026. Check Zapier's official pricing page for current rates.
Going Beyond Google: Other Powerful Jotform Zapier Workflows
The Google Docs and Google Meet examples are great starting points. But let's think bigger.
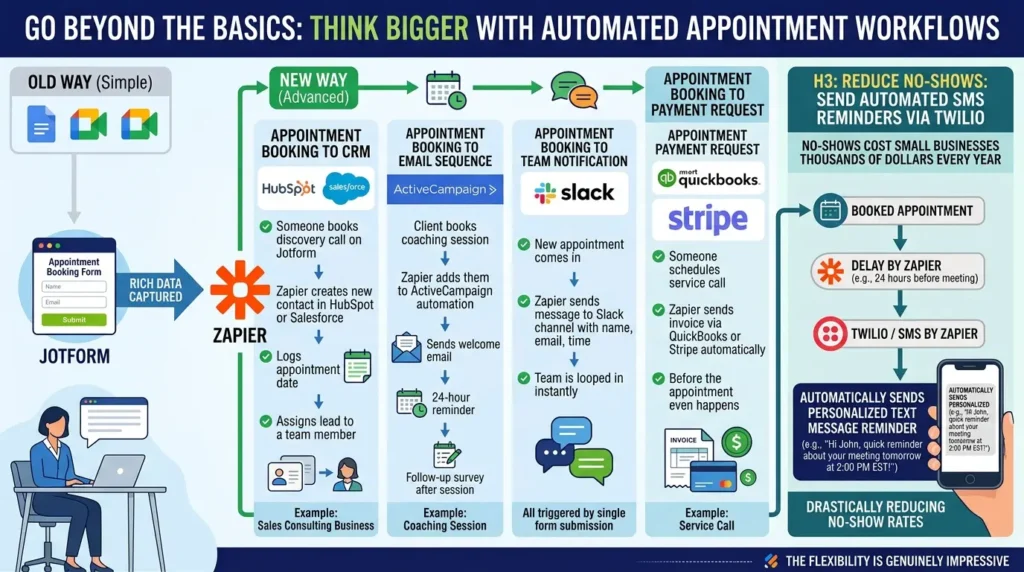
- Appointment booking to CRM: You run a sales consulting business. Someone books a discovery call through your Jotform. Zapier automatically creates a new contact in your HubSpot or Salesforce account, logs the appointment date, and assigns the lead to a team member.
- Appointment booking to email sequence: A client books a coaching session. Zapier adds them to an ActiveCampaign automation that sends a welcome email, a 24-hour reminder, and a follow-up survey after the session. All triggered by a single form submission.
- Appointment booking to team notification: Every time a new appointment comes in, Zapier sends a message to your team's Slack channel with the person's name, email, and scheduled time. Your whole team is looped in instantly.
- Appointment booking to payment request: Someone schedules a service call. Zapier sends them an invoice via QuickBooks or Stripe automatically, before the appointment even happens.
The flexibility here is genuinely impressive. The Jotform appointment field captures rich data, and Zapier can route that data in any direction you need.
Reduce No-Shows: Send Automated SMS Reminders via Twilio
Booking the appointment is only half the battle, getting clients to actually show up is the other half. No-shows cost small businesses thousands of dollars every year in wasted time.
You can expand your Zapier workflow by adding a delay step (using Delay by Zapier) set to 24 hours before the booked meeting time, followed by an action step using Twilio or SMS by Zapier. This automatically sends a personalized text message reminder (e.g., "Hi John, quick reminder about your meeting tomorrow at 2:00 PM EST!"), drastically reducing no-show rates.
🏥 Legal Compliance Notice: Zapier, Jotform, and HIPAA
If your business handles Protected Health Information (PHI) under US HIPAA regulations, you cannot use standard Zapier workflows to transfer patient appointment data.
- Jotform Status: Fully HIPAA-compliant on Gold ($99/mo) and Enterprise plans with a signed Business Associate Agreement (BAA).
- Zapier Status: Zapier explicitly refuses to sign BAAs on ANY plan (including Team and Enterprise) and prohibits passing PHI through its servers.
How to Automate Healthcare Appointments Legally:
- Use Jotform Native HIPAA Integrations (Recommended): Connect your HIPAA Jotform account directly to Google Calendar, Sheets, or Salesforce using Jotform's built-in integrations covered under Jotform's BAA — completely bypassing Zapier.
- De-Identify Zapier Data Payload: If you must use Zapier for team alerts, configure Jotform to send only non-sensitive metadata (e.g., an anonymous Reference ID) to Zapier — never pass patient names, emails, or medical notes.
⚠️ Disclaimer: Passing identifiable PHI through Zapier violates the HIPAA Security Rule and HITECH Act, carrying federal penalties up to $50,000 per violation. Always consult your compliance officer or legal counsel.
Use a webhook when you need a custom endpoint
Jotform documents a webhook setup under Form Builder → Settings → Integrations → Webhooks. Add the endpoint URL, complete the integration, and submit a test response. In Zapier, a Catch Hook parses incoming request data, while Catch Raw Hook keeps the body unparsed and includes headers. Choose the trigger that matches the payload you need and inspect the captured sample before mapping fields.
Webhooks can avoid a polling-based design, but they are not a sub-second delivery guarantee. Jotform documents a 30-second request timeout for its webhook integration. Zapier documents payload limits and warns that high request volume can delay delivery. Treat delivery as an asynchronous boundary: validate the payload, log the submission identifier, design for retries or duplicate protection, and monitor failed runs.
Do not assume a file upload is available as a binary object. Inspect the current sample, confirm the file URL’s access requirements and size, and use a tested download-and-upload method only when the destination and permissions support it. Never send sensitive files to a third-party endpoint without reviewing the data-flow and retention implications.
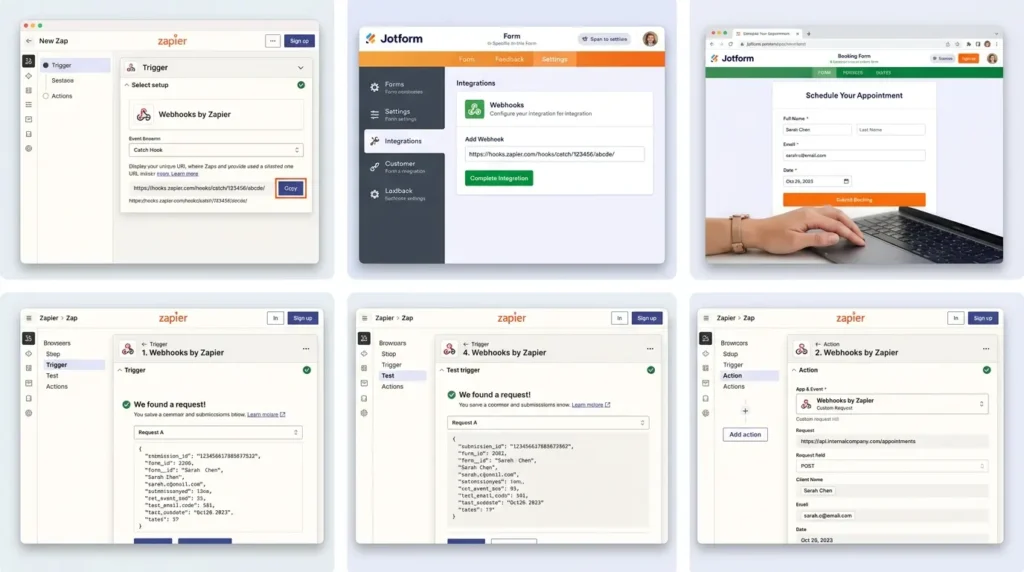
How to Set Up a Jotform Webhook in Zapier (5-Minute Guide)
Here is the exact step-by-step process to connect Jotform to Zapier using webhooks:
- Step 1: Create a Catch Hook in Zapier
Open Zapier and click Create Zap. For the trigger app, search for Webhooks by Zapier. Select Catch Hook as the trigger event and click Continue. Skip the "Child Key" option and proceed until Zapier generates your unique Webhook URL (it looks like https://hooks.zapier.com/hooks/catch/123456/abcde/). Copy this URL. - Step 2: Add the Webhook URL inside Jotform
Open your form in Jotform. Go to Settings at the top bar > click Integrations in the left menu > search for Webhooks. Paste your Zapier Webhook URL into the Add Webhook field, then click Complete Integration. - Step 3: Submit a Test Response in Jotform
Open your published Jotform form in a new tab and submit a complete test booking with all fields filled in. This sends the first live Webhook payload to Zapier. - Step 4: Test Trigger and Verify Payload in Zapier
Return to Zapier and click Test Trigger. Zapier will catch the incoming payload. You'll see raw JSON data containing submission IDs, appointment dates, full names, emails, and file upload URLs. - Step 5: Connect Your Custom Action or Internal API
Add your action step. You can route this data to standard apps, or select Webhooks by Zapier (Custom Request or POST) to push the appointment data directly into your company’s internal database, custom backend, or proprietary CRM API.
🛠️ Developer Tip: Parsing Jotform Raw JSON Payload
Jotform sends webhook payloads as raw JSON form data. If field names look like q3_fullName[first] or q4_email, use Formatter by Zapier > Utilities > Line Item to Text or a quick Code by Zapier (JavaScript / Python) step to clean nested JSON arrays before posting to custom endpoints.
How to Pass Actual File Uploads (Not Just Web Links)
When a client uploads a document (like a resume, medical intake form, or ID) to your Jotform, standard Zapier triggers usually pass a text URL link to the file rather than the raw file itself. If you try to dump that link straight into SharePoint or Google Drive, you end up saving a text file with a link inside, not the actual PDF or image.
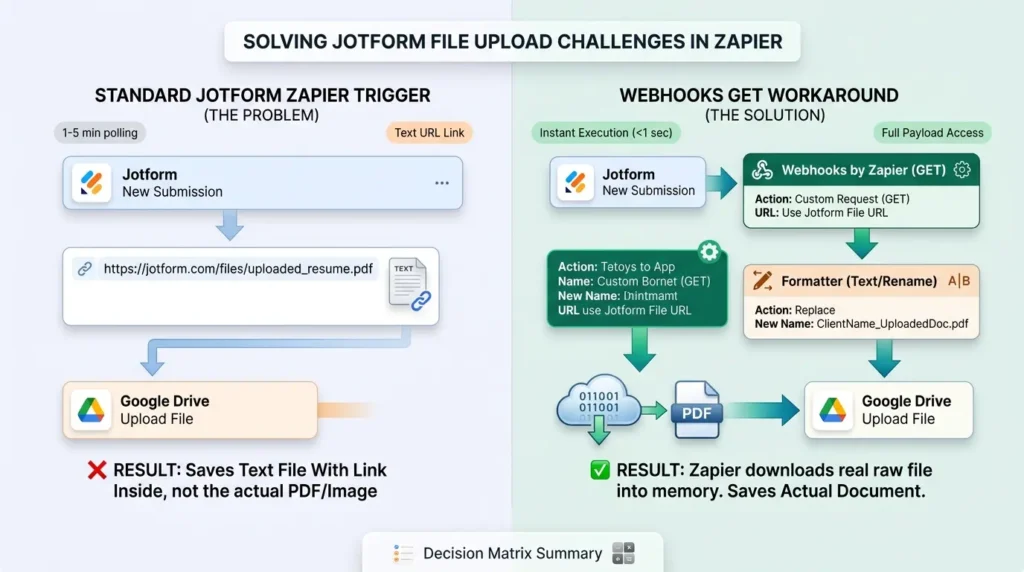
🛠️ The Community Workaround: Webhooks GET Step
To download the actual binary file, add a Webhooks by Zapier (Custom Request or GET) action step after your trigger. Use the GET event pointed at Jotform's file URL. Zapier will download the real raw file object into memory, allowing your next step (e.g., Google Drive Upload File) to save the actual document. Combine this with Formatter to auto-rename the file to ClientName_UploadedDoc.pdf!
⚡ Decision Matrix: Native Zapier Trigger vs. Webhook Trigger
| Requirement | Use Native Jotform Trigger | Use Webhooks by Zapier |
|---|---|---|
| Setup Speed | Fastest (Point & click) | Requires URL copying |
| Data Speed | 1-5 minute polling | Instant execution (<1 sec) |
| File Attachments | Passes text link | Passes full payload / raw GET access |
| Reliability with Complex Logic | Good for basic forms | Best for heavy conditional logic |
Security and privacy boundaries
Jotform and Zapier publish security and privacy controls, but a connected workflow is not automatically secure or compliant merely because each vendor advertises security features. Data may pass through Jotform, Zapier, Google, the destination app, email or messaging providers, and any custom endpoint. Review permissions, data minimization, logs, retention, regional requirements, and the terms of every recipient.
Zapier’s current HIPAA guidance says that Zapier is not HIPAA compliant and does not sign Business Associate Agreements. Do not use a standard Zapier workflow to store, send, or automate Protected Health Information unless your compliance and legal teams have approved a documented architecture that meets the applicable requirements. Jotform separately advertises HIPAA-enabled forms and says a Business Associate Agreement is available upon request; that statement does not make the downstream Zapier workflow compliant.
For non-HIPAA workflows, send only the fields each destination needs, avoid placing sensitive values in task names or Slack messages, restrict connected accounts, review Zap history retention, and remove unused connections. Zapier’s current documentation describes Zap history retention as 29–69 days, with Enterprise customization options; do not assume that a flat 30-day period applies to every account.
Zapier vs. Alternatives: Which Automation Tool Is Right for You?
Zapier is the most popular option, but it's not the only one. Here's how it compares to the main alternatives for Jotform appointment automation.
| Platform | Apps Supported | Free Tier | Best For | Jotform Native? |
|---|---|---|---|---|
| Zapier | 7,000+ | 100 tasks/mo | Beginners & broad coverage | ✓ Yes |
| Make (Integromat) | 1,500+ | 1,000 ops/mo | Visual workflows, complex logic | ✓ Yes |
| n8n | 400+ | Self-hosted free | Developers, privacy-conscious | ✓ Yes |
| Pipedream | 2,500+ | 10,000 invocations | Code-friendly teams | ✓ Yes |
| Jotform Native | 30+ direct | Unlimited | Simple 1-to-1 connections | ✓ Built-in |
Quick Troubleshooting Guide
Things don't always work perfectly on the first try. Here's how to diagnose common issues fast.
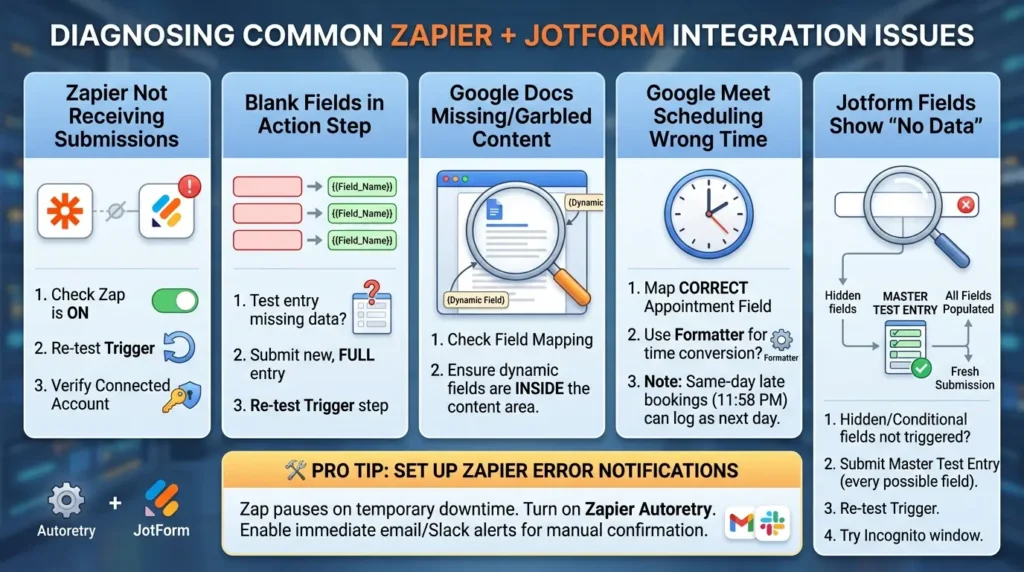
Zapier isn't receiving submissions from Jotform
Check that the Zap is turned on. Then go back to the trigger step and re-test it. Also verify that your Jotform account is still properly connected in Zapier's "Connected Accounts" section.
Fields show up as blank in the action step
This usually means the test submission didn't include data in those fields. Submit another test entry with all fields filled in, then re-test the trigger step.
Google Docs is created but the content is missing or garbled
Go back to the action configuration and check your field mapping. Make sure the dynamic fields are inside the content area, not accidentally outside it.
Google Meet isn't scheduling at the right time
Double-check that you're mapping the correct appointment field to the start time. If your Jotform collects time in a specific format, Zapier may need a Formatter step to convert it properly.
One quirk I noticed: if your Jotform appointment field allows same-day bookings and someone books at 11:58 PM, Zapier sometimes logs it as the next day’s date. Not a dealbreaker, but worth knowing if you’re doing date-based filtering.
🛠️ Pro Tip: Set Up Zapier Error Notifications
If a third-party service (like Google Drive or Meet) experiences temporary downtime, your Zap might pause or fail. Turn on Zapier Autoretry (available on paid plans) to automatically attempt failed steps again. Additionally, enable immediate email or Slack notifications for failed Zap runs so your team can manually confirm bookings if an API briefly drops.
Jotform fields show up as "No Data" in Zapier
This is a classic headache. You know the client filled out a field, but Zapier insists it's empty during field mapping. This almost always happens with hidden fields or conditional logic fields that weren't visible when you ran your test submission.
The Fix: Go back to your Jotform and submit a "master test entry" where you intentionally fill out every single possible field, including triggering all conditional logic branches. Then, go back to Zapier, re-test the trigger step, and pull in that fresh submission. Every field will now map cleanly. (Pro tip: If the data still won't refresh, open Zapier in an Incognito window to bypass browser cache glitches).
How Jotform Appointment Automation Saves Real Time
Let's put some numbers to this. Say you manage appointments for a small clinic with 20 bookings per week.
Without automation:
- Create a patient record manually: 3 minutes
- Send confirmation email manually: 2 minutes
- Schedule video call manually: 2 minutes
- Notify staff manually: 1 minute
That's 8 minutes per booking. Times 20 bookings a week. That's 2.7 hours of admin work every week, just for basic appointment management.
With the Jotform and Zapier integration set up properly, all four of those tasks happen automatically the moment someone submits the form. Your 2.7 hours per week becomes roughly 20 minutes of setup once, and then it runs itself.
Over a year, that's over 130 hours saved, a figure consistent with industry automation statistics showing small businesses save 10-20 hours per week through no-code workflows.
🧮 Interactive Calculator
How Much Time Will You Save?
Your estimated time saved per year:
139 hours
≈ 3.5 full work weeks recovered
⚡ Before vs After: The Automation Difference
❌ Manual Workflow (Before)
- Email notification arrives
- Open Jotform, copy client info
- Create Google Doc manually
- Open Calendar, schedule Meet
- Compose confirmation email
- Notify team in Slack channel
- Update CRM record by hand
- ⏱️ Total: 8 minutes/booking
✅ Automated Workflow (After)
- Client books via Jotform
- Google Doc auto-created
- Google Meet auto-scheduled
- Confirmation email auto-sent
- Slack notification auto-fired
- CRM record auto-updated
- Team auto-notified
- ⏱️ Total: 0 minutes/booking
📊 Automation Impact by the Numbers
7,000+
Apps Zapier connects to
130 hrs
Saved per year (avg. small business)
68%
Reduction in no-shows with SMS reminders
$11k+
Annual value of recovered time
Sources: Zapier State of Automation Report 2025, McKinsey SMB Productivity Study, Twilio SMS Engagement Data.
Example workflow patterns by industry
Different businesses use Jotform + Zapier automation in different ways. The following are illustrative workflow patterns, not verified customer case studies. Each pattern must be reviewed against the organization’s data-protection obligations, destination-app permissions, and operational fallback process before implementation.
Healthcare & Clinics
Patient fills intake form → Secure HIPAA submission stored → BAA-covered native Jotform integration triggers EHR update.
⛔ CRITICAL: Zapier refuses BAAs. Use Jotform Native HIPAA Integrations for patient PHI.
Salons & Spas
Client picks stylist & time → Google Calendar event created → stylist notified on Slack → loyalty points updated in POS.
Consulting & Coaching
Lead books discovery call → HubSpot contact created → onboarding Google Doc generated → invoice sent via Stripe.
Tutoring & Education
Student books session → Zoom link generated → parent notified by email → attendance logged in Google Sheets.
Legal & Law Firms
Prospect books consultation → Clio or MyCase matter created → intake form emailed → calendar blocked for travel time.
Real Estate
Buyer books showing → property details pulled into Follow Up Boss → agent notified via SMS → listing photo PDF emailed.
Printable Setup Checklist
Print this checklist or save it as PDF to follow along offline while setting up your Jotform + Zapier workflow.
✅ Pre-Setup
- ☐ Create a Jotform account (Gold or above for HIPAA)
- ☐ Create a Zapier account (Free for testing, paid for production)
- ☐ Connect your Google Workspace account
- ☐ Submit at least one test entry to your Jotform
✅ Form Setup
- ☐ Add Appointment element to your form
- ☐ Configure available dates and time slots
- ☐ Set the correct time zone on the form
- ☐ Label all fields clearly (Full Name, Email, etc.)
- ☐ Test the form by submitting a real entry
✅ Zap Configuration
- ☐ Create a new Zap
- ☐ Set Jotform as trigger (New Submission event)
- ☐ Connect Jotform account & select form
- ☐ Test trigger — confirm appointment data appears
- ☐ Add Google Docs action (Create Document from Text)
- ☐ Map fields: Name, Email, Appointment Date
- ☐ Add Google Meet action (Schedule a Meeting)
- ☐ Use Formatter to add 60 minutes to end time
- ☐ Map attendee email field
- ☐ Test each step independently
✅ Go-Live
- ☐ Toggle Zap to "On"
- ☐ Submit a real test booking end-to-end
- ☐ Verify Google Doc created with correct data
- ☐ Verify Google Meet invite received
- ☐ Set up email alerts for failed Zap runs
- ☐ Document the workflow for your team
📝 What I Wish Someone Told Me Before I Started
- Your first Zap will probably break. That's normal. Zapier's error logs are your best friend.
- Start with ONE action, not five. Get that working perfectly, then add more.
- Name your Zaps clearly (e.g., "New Booking → Google Doc + Meet"). Future-you will thank present-you.
Final Thoughts: The Jotform Zapier Combo Is a Workflow Multiplier
Here's the bottom line.
Jotform and Zapier can connect a form submission to document, calendar, notification, CRM, or custom-endpoint actions. The reliable way to build the workflow is to start with a published form, inspect a real test submission, map only the fields you need, test each action, validate time zones and permissions, and define a recovery path for failed or changed bookings.
Every appointment that comes in through your Jotform can trigger an entire chain of events across your business tools. Documents get created. Meetings get scheduled. Contacts get added to CRMs. Teams get notified. Clients get confirmation emails.
And none of it requires you to be sitting at your computer, copying and pasting data from one app to another.
That's the real power of the Jotform Zapier integration. It doesn't just save time. It removes entire categories of work from your day.
If you haven't set this up yet, now is a really good time to start. Sign up for Jotform, build your appointment form, connect it to Zapier, and start automating. The first Zap is always the hardest. After that, you'll wonder how you ever worked without it.
Ready to automate?
Build Your First Jotform + Zapier Workflow Today
Set up your appointment form, connect Zapier, and have your first automated workflow running in under 30 minutes — no code required.
FAQ: Jotform Zapier Integration
Does connecting Jotform to Zapier require coding skills?
The standard point-and-click integration does not require coding. You can connect accounts, select forms, and map fields using the visual Zapier editor. Advanced workflows using Webhooks by Zapier, Code by Zapier, or custom API requests may require technical knowledge of HTTP methods, JSON payloads, or scripting.
How many apps can I connect to Jotform through Zapier?
Zapier’s app catalog changes regularly. As of August 20, 2026, the Jotform integrations directory displayed more than 9,000 connected applications. Check the current Zapier directory to confirm that the specific app and event you need are available on your plan.
Can I trigger multiple actions from one Jotform submission?
Yes, multi-step Zaps allow one trigger to start a sequence of actions across different apps. The number of steps you can add depends on your current Zapier plan and product limits. Each successful billable action step in the workflow normally counts as one task toward your monthly quota.
Is a paid Zapier plan required for Jotform integration?
Zapier offers a free plan, but the features, app access, task allowance, and workflow limits can change. Multi-step workflows, premium apps, and higher task volumes may require a paid plan depending on the current product rules. Review the current Zapier pricing page to confirm which features and task quotas apply to your account and region.
What appointment data does Jotform send to Zapier?
The Jotform Appointment element can capture date, time, duration, and time zone information. The exact fields and labels that appear in Zapier depend on your form configuration and the sample submission returned by the integration. Always inspect the captured sample in the Zap editor before mapping fields to actions.
Can I use Zapier’s Copilot to build Jotform Zaps?
Zapier’s AI-powered Copilot can suggest workflow structures and help you find apps. You must still verify the suggested trigger, connect the correct accounts, map the fields manually to ensure accuracy, and test each step before publishing the Zap.
What happens if a Zapier step fails mid-workflow?
If a step fails, subsequent steps in that run will not execute unless you have configured an error handler path. You can review failed runs in your Zap history, and some paid plans offer an Autoreplay feature. Design your workflow with a recovery path or manual verification step for booking-critical actions.
Can I send appointment data to a CRM like Salesforce or HubSpot?
Yes, you can add actions to create or update records in CRMs like Salesforce or HubSpot. Confirm that the destination app and the specific action you need are available in the Zapier directory and that your account has the necessary permissions to write data to those systems.
How do I test my Jotform Zapier integration before going live?
Submit a complete test response to your published Jotform, then use the “Test Trigger” button in Zapier to pull in that sample. Test each action step independently and verify the result in the destination app. Finally, run one end-to-end test from form submission to the final action before turning the Zap on.
Can Zapier automatically add time to the appointment end time?
You can use the Formatter by Zapier tool to transform date and time values, including adding a specific duration to a start time. Confirm the input format and the destination time zone in the Formatter step, and verify the final event time in your calendar before relying on the calculation.
📋 Article Timeline & History
Successfully updated on September 16, 2026 with the latest details.
This article was originally published on July 27, 2026.

Was this article helpful?