
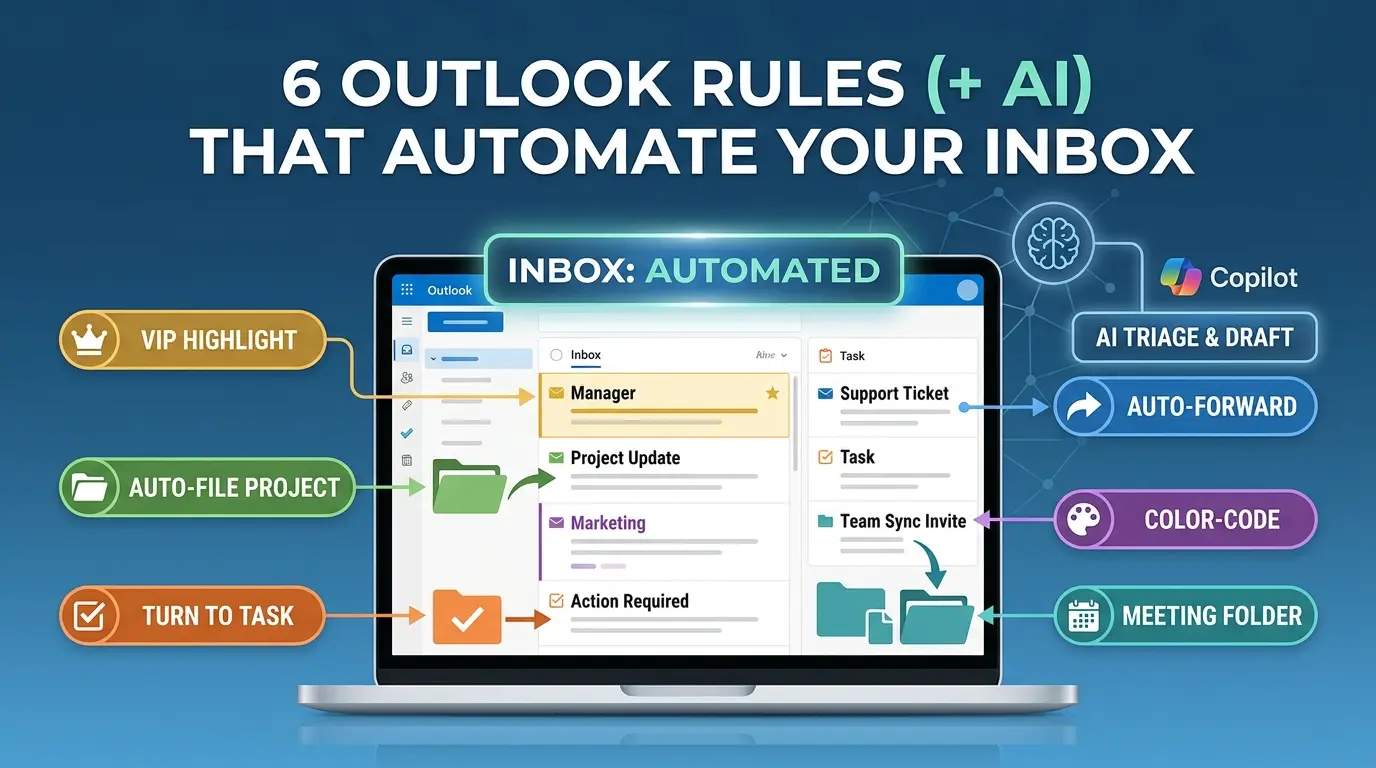

There was a stretch of about two years where my mornings all looked the same. Coffee, laptop open, and forty-five minutes of scrolling through an inbox that had refilled itself overnight. Client requests mixed in with newsletters. A meeting invite from three days ago buried under a thread about lunch orders. Somewhere in there, an email from my actual boss that I didn’t see until the afternoon.
That’s not a discipline problem. That’s a system problem.
The week I finally set up my first rule, just the VIP highlight, I realized I’d been missing my manager’s emails for months. Not because I was careless, but because they looked identical to everything else in a list of 90. That one change took four minutes. I haven’t missed one since.
The broader email-overload problem is documented, but the numbers need context. McKinsey Global Institute estimated that the average interaction worker, high-skill knowledge workers such as managers and professionals, spends about 28% of the workweek managing email. That is not an Outlook-specific measurement, and it should not be read as a universal result for every role or organization.
Microsoft’s 2025 Work Trend Index reports that the average worker receives 117 emails per day. The same report says employees are interrupted every two minutes by meetings, emails, or chats; its “275 interruptions per day” figure is calculated from the top 20% of users by ping volume and uses a 24-hour-day calculation, so it should not be presented as the universal average for all employees.
Here’s the uncomfortable truth most productivity advice won’t say out loud: you cannot organize your way out of a full inbox. Folders, labels, and “quick sorting sessions” are all downstream fixes. They deal with email after it has already stolen your attention. The real fix happens upstream, before the email ever reaches your eyes.
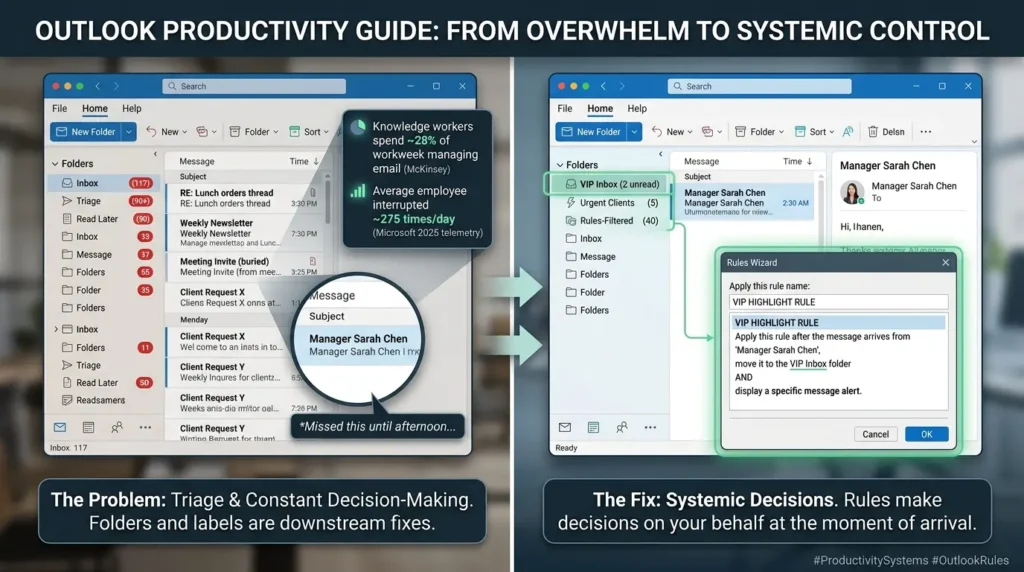
That’s what Outlook rules do. They make decisions on your behalf, at the moment of arrival, based on logic you only have to define once. Set it up on a Tuesday afternoon, and it keeps paying you back every single day after that.
This guide walks through six specific rules, why each one works, the exact steps to build them, the mistakes that quietly break them, and a framework for thinking about your inbox that goes beyond “just be more organized.”
⚡ What you’ll walk away with
Click any rule to expand or collapseNever miss VIP emails (Rule 1)
A proven setup to make critical messages from key stakeholders immediately visible and impossible to miss.
Automate project filing (Rule 2)
Automatic organization and filing rules for project updates and recurring operational emails.
Self-populating task list (Rule 3)
A workflow system where actionable emails transform directly into a organized task list from your inbox.
Eliminate manual forwarding (Rule 4)
Automated routing strategies to stop being the “forwarding middleman” between teams and tools.
10-second color-coded inbox scan (Rule 5)
A color-coding logic allowing you to visually assess priority items in under 10 seconds.
High-priority meeting invites (Rule 6)
System rules ensuring meeting requests and calendar invites never get buried under routine clutter.
Why Sorting Your Inbox Later Never Works
Most people try to fix email overload with behavior: check less often, unsubscribe more, batch-process twice a day. Those habits help, but they all share the same weakness, they depend on you remembering to do them, every day, forever.
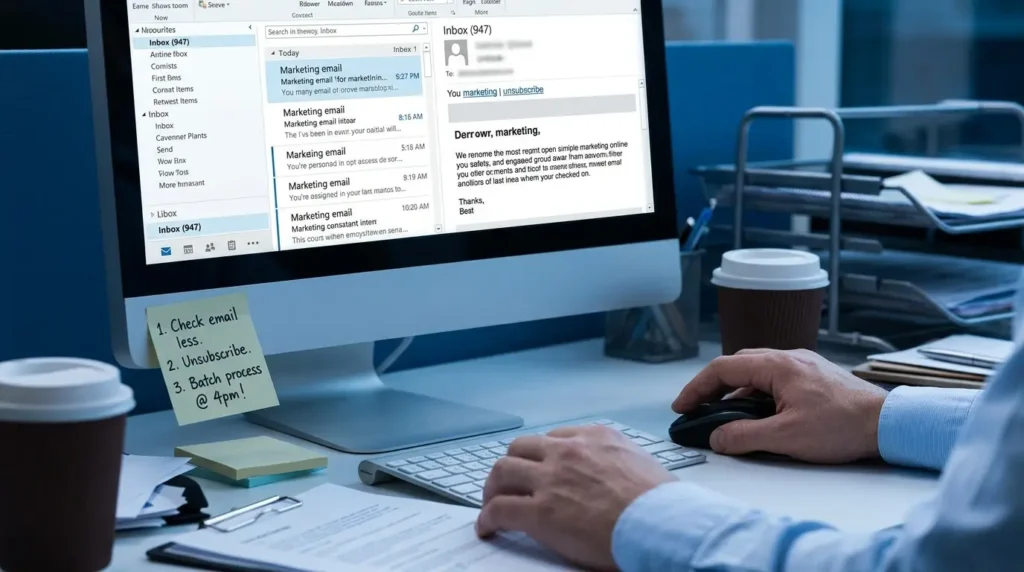
Rules don't depend on memory. Once built, they run whether you're focused, tired, in back-to-back meetings, or on vacation.
Think of it like the difference between manually directing traffic at an intersection versus installing traffic lights. A person directing traffic works fine for an hour. Traffic lights work at 3 a.m. on a holiday when nobody's watching. That's the entire value of automation: it doesn't get tired.
Any minute you spend deciding what to do with an email you've already opened is a minute you could have saved by deciding once, in advance, with a rule.
The Piece Rules Can't Fix: Notifications and Attention
Rules solve what happens to an email after it arrives. They don't solve the ping that pulls your eyes away from what you were doing the second it lands. That's a separate problem, and it's worth naming honestly: even a perfectly organized inbox can still destroy your focus if every new message announces itself with a pop-up and a badge count.
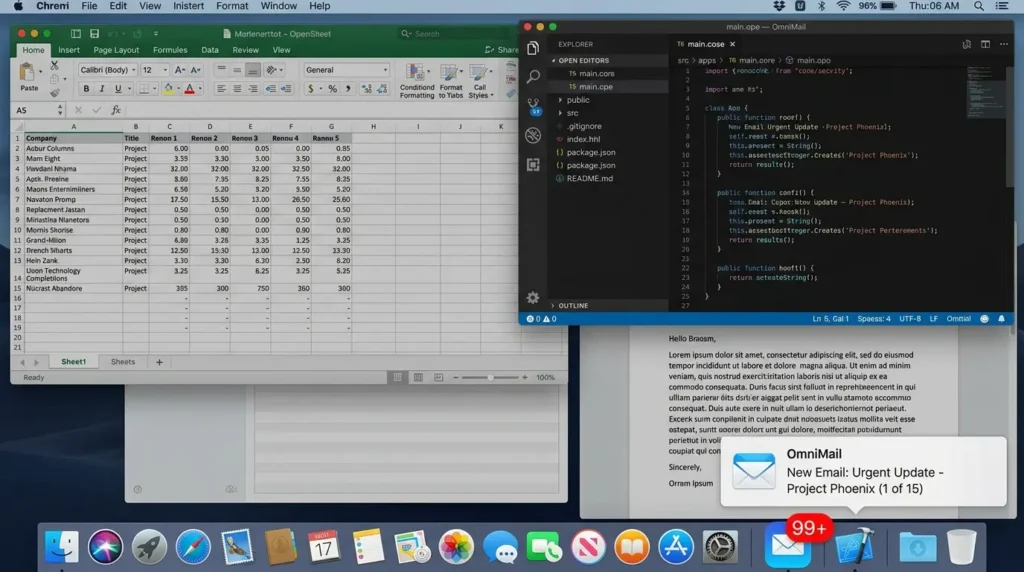
Two habits, borrowed from people who've actually fixed this, do more for daily focus than any single rule:
- Turn off the pop-up notification and the unread-count icon: For a lot of people, this alone is the single biggest change they make, not because the emails stop arriving, but because they stop interrupting. You still see everything when you choose to look; you just stop reacting to every arrival in real time.
- Check email in batches instead of continuously: Two or three set windows a day, say, mid-morning, after lunch, and late afternoon, let you do focused, uninterrupted work in between, instead of half-attention all day long.
Neither of these takes more than a minute to set up, and together they solve the half of the email problem that rules were never designed to touch: the constant pull on your attention, not just the sorting of the message itself.
The Upstream Framework: Highlight, File, Route, Track
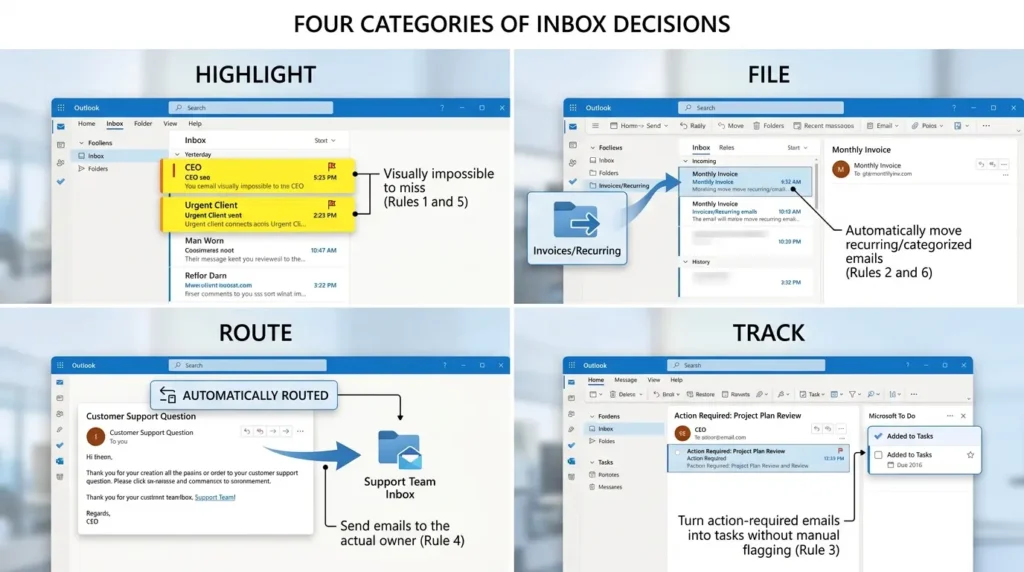
Rather than treating these six rules as a random checklist, it helps to see them as four categories of decisions, each solving a different kind of inbox pain:
- Highlight make critical senders and topics visually impossible to miss (Rules 1 and 5)
- File automatically move recurring or categorized emails into their own space (Rules 2 and 6)
- Route send emails to the person or mailbox that should actually own them (Rule 4)
- Track turn action-required emails into tasks without manual flagging (Rule 3)
Once you see the pattern, you stop thinking "I need a rule for this one specific email" and start thinking "which of these four jobs is this email doing to my attention?"
One Thing to Check Before You Start: Which Outlook Are You Actually Using?
Here's a detail most guides skip entirely, and it will save you ten minutes of confused clicking: Microsoft currently runs two different versions of Outlook side by side, and they don't have identical feature sets.
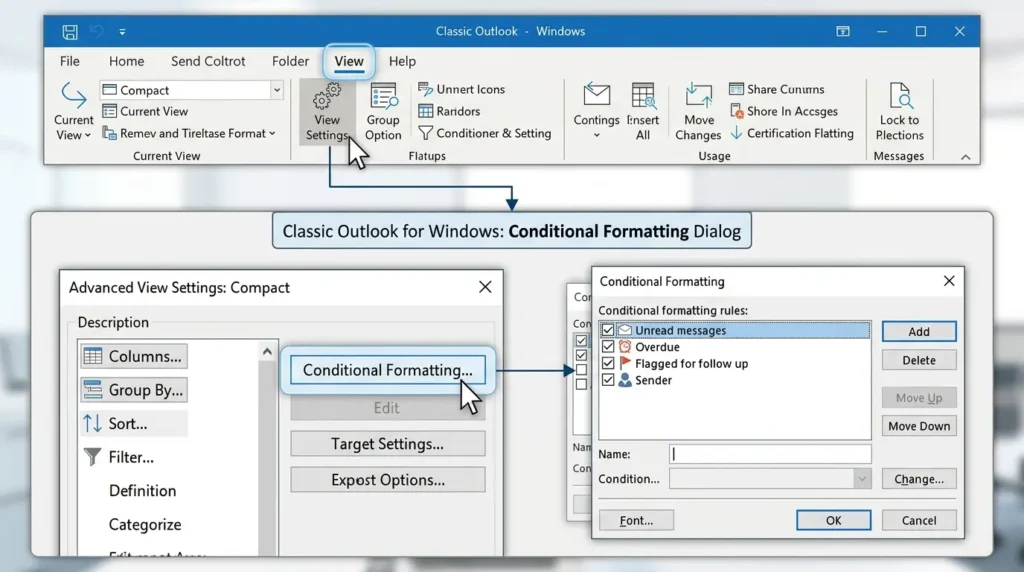
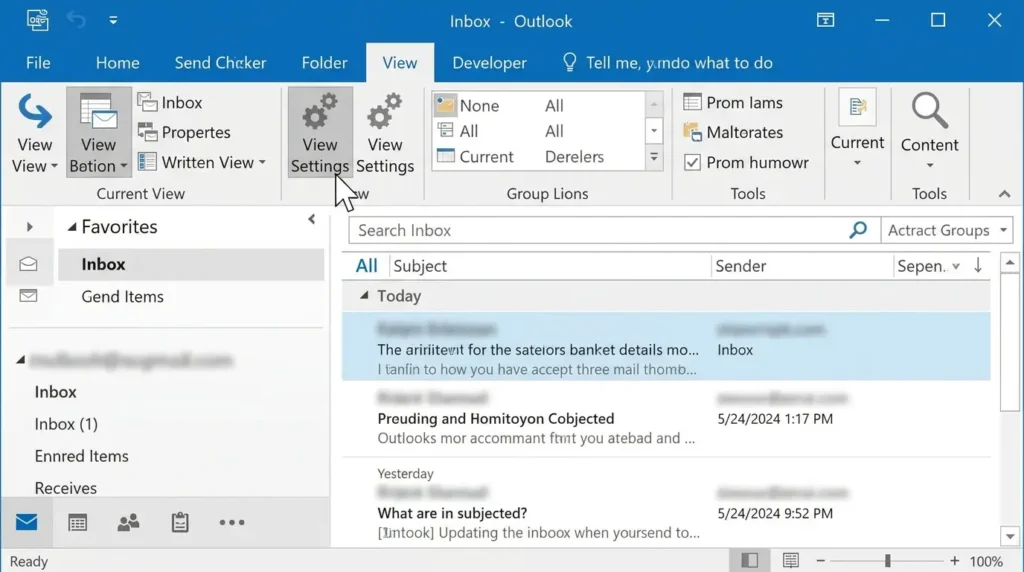
Classic Outlook for Windows, the version with the full ribbon and a File menu, has the complete conditional formatting dialog, reached through View > View Settings. Every step below is written for this version, since it's still the most common setup in most organizations.
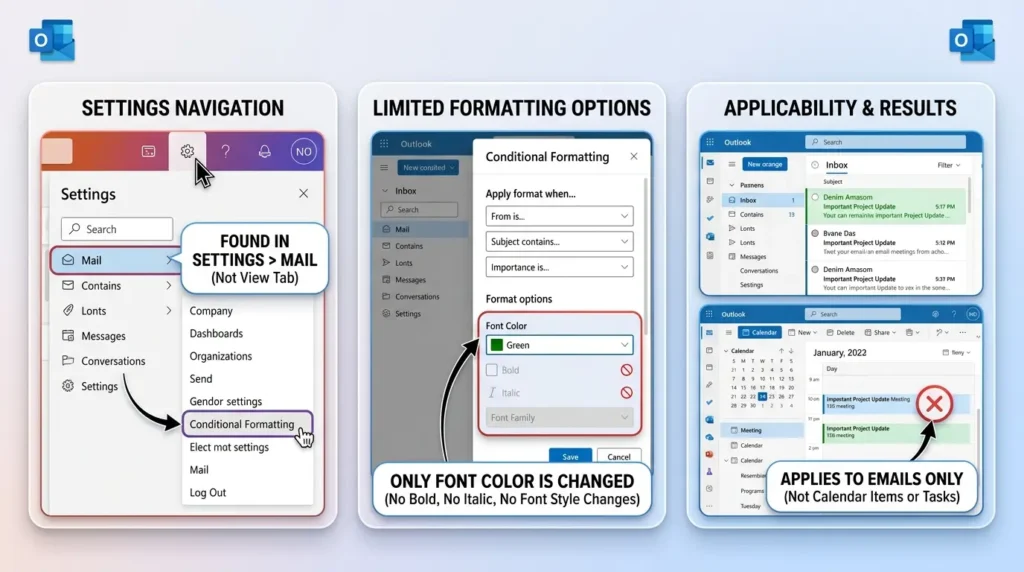
New Outlook (and Outlook on the web), the version Microsoft is gradually pushing everyone toward, also supports conditional formatting now, but it works differently: you'll find it under Settings > Mail > Conditional Formatting, not the View tab. It only changes font color (no bold, no font style changes), offers fewer condition types, and as of now applies to emails only, not calendar items or tasks.
Do not assume that every rule behaves identically in every Outlook client. Microsoft documents rules separately for new Outlook, classic Outlook, Outlook on the web, and Outlook.com. New Outlook supports many standard inbox-rule scenarios, but Microsoft also notes that some rules created in classic Outlook are client-side and cannot be processed by new Outlook. Treat the rule type, account host, and Outlook client as part of the setup, not as interchangeable details.
For a practical workflow, build the rule in the client where you intend to maintain it, confirm that it appears in the account’s Rules settings, and test it with a non-critical message before relying on it for forwarding, triage, or meeting notifications.
Scope and prerequisites
The paths in this guide are examples for supported Microsoft 365 or Exchange-hosted accounts and may vary by Outlook client, account type, organization policy, and feature rollout. Before changing a rule that moves, forwards, deletes, or flags mail, record the current rule order, confirm the destination folder or recipient, and test with a non-critical message. Conditional formatting has an additional requirement: Microsoft documents it for work or school accounts with a qualifying Microsoft 365 subscription.
| Task | Classic Outlook | New Outlook | Outlook on the web | Mobile note |
|---|---|---|---|---|
| Standard Inbox rules | Available, with some client-side rule scenarios | Partially available compared with classic Outlook | Supported through Inbox rules settings | Use the account service or Copilot capability; native settings are more limited |
| Conditional formatting | Available with broader formatting options | Partially available; Microsoft documents font-color selection and fewer options | Use the documented web experience where available | Treat as a message-list display feature and test visual behavior |
| Flagged email in Microsoft To Do | Supported subject to account and mailbox limits | Supported subject to account and mailbox limits | Supported subject to account and mailbox limits | Shared mailboxes and shared folders are not supported for Flagged email sync |
| Copilot rule management | Availability depends on account, license, and rollout | Availability depends on account, license, and rollout | Availability depends on account, license, and rollout | Microsoft documents create, view, update, and delete with Copilot on iOS and Android |
What About Outlook Mobile (iOS/Android)?
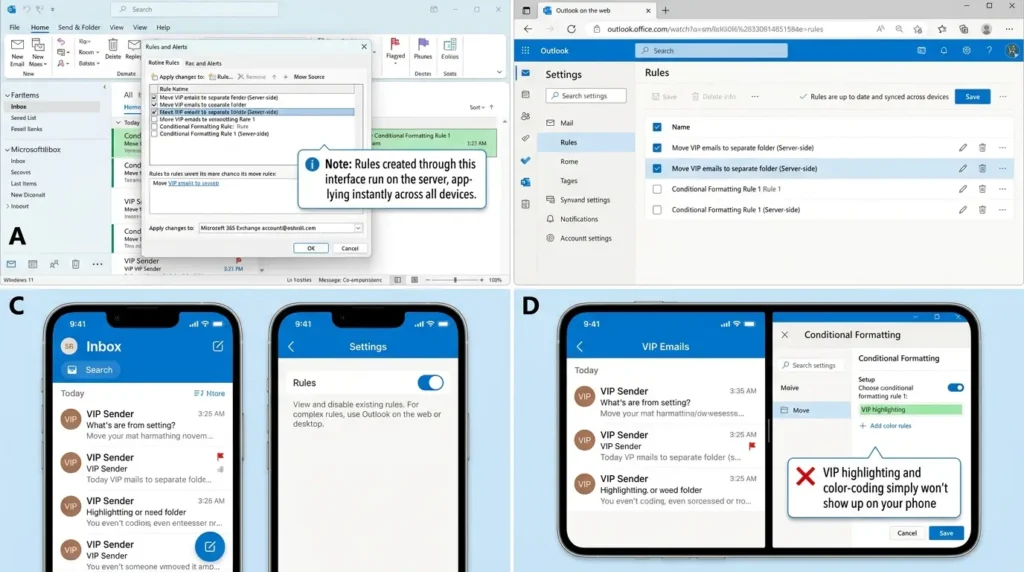
The result depends on the account, rule type, and client. A rule that is processed by the mailbox service can affect incoming mail regardless of which device you later use to read it. However, Microsoft notes that some classic-Outlook rules are client-side and cannot be processed by new Outlook, so “all rules run everywhere” is too broad.
On mobile, the native Outlook Rules settings experience is more limited than the desktop and web settings experience. If you use Copilot in Outlook, Microsoft currently documents creating, viewing, updating, and deleting standard inbox rules on iOS and Android; the native Rules settings link itself is not available there, so use Outlook on the web or desktop when you need the full settings page.
Conditional formatting is a message-list display feature rather than a mailbox-routing action. Do not assume that a color or font treatment configured on desktop will appear in the mobile message list. Test the visual behavior separately on the mobile client you use.
Rule 1: Make VIP Emails Impossible to Miss
⚙ Path differs by version — see note belowIf your manager or a key client sends something, it shouldn't be competing visually with a newsletter about a webinar you'll never attend. This rule uses conditional formatting to force those emails to stand out the second they land.
How to set it up:
- Go to the View tab and click View Settings.
- Choose Conditional Formatting, then click Add.
- Name the rule something clear, like "Boss Email" or "VIP Clients."
- Click Font, choose a bold style, and pick a striking color, dark red or deep blue both work well.
- Click Condition, and in the From field, type the exact email address you want to flag.
- Confirm and close. That sender's emails will now be visually distinct the moment they arrive.
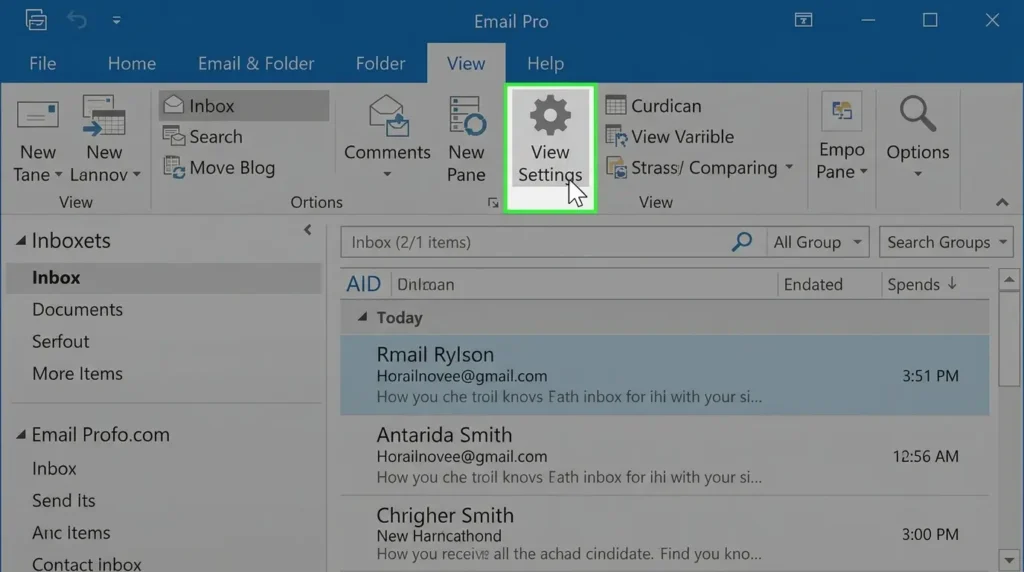
Tip: Don't limit this to one person. Stack a handful of these rules for your two or three most important contacts — your manager, your biggest client, your CFO — so your eyes are trained to catch them instantly, without reading a single word first. Some users take this a step further and pin VIP messages to the top of the inbox entirely, on top of the color, so they never scroll past one by accident. If you're tracking several tiers of importance — direct manager, executive leadership, top clients — give each tier its own distinct color rather than reusing the same red for everyone. That way a glance tells you not just "this is important" but "this is important at this level."
Rule 2: Auto-File Project and Recurring Emails
✓ Identical steps in Classic & New OutlookJuggling more than one project at a time turns your inbox into a blender. Updates from Project A get mixed with Project B, HR notices, and vendor replies, and finding one specific thread means scrolling through everything else first.
This rule works whenever a group of emails shares something consistent in the subject line, a project code, a system name, a recurring keyword. HR notification emails are a great example: they almost always use the same subject format, which makes them perfect candidates for automatic filing.
How to set it up:
- Find an email related to the project or category you want to organize. Right-click it.
- Choose Rules, then Create Rule.
- Tick Subject Contains and enter the keyword or project code that's always present.
- Tick Move the Item to Folder, then select an existing folder or create a new one.
- Save the rule.
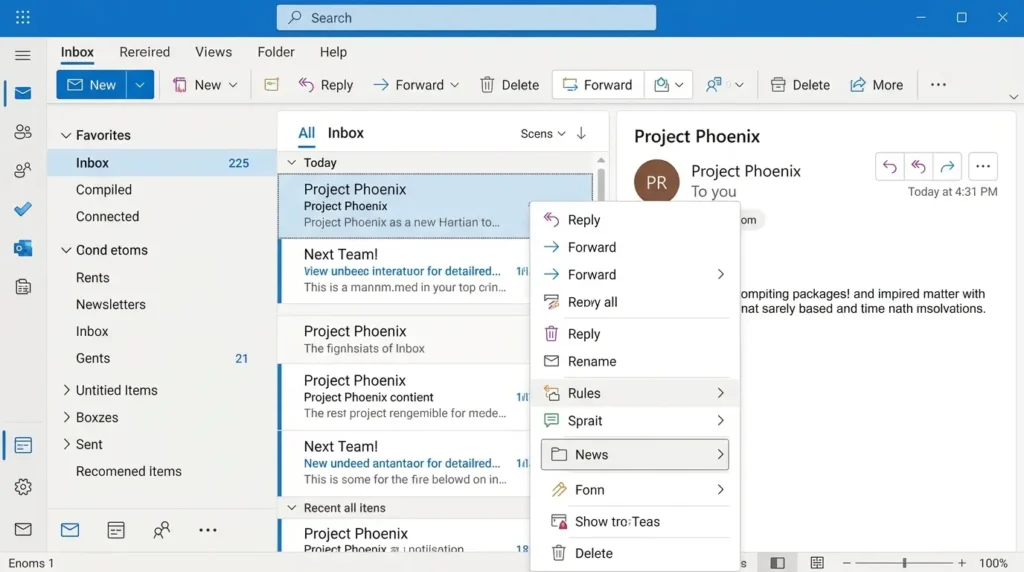
By default, filed emails stay marked as unread, a built-in visual reminder that something's waiting. If you'd rather they arrive already marked as read (useful for high-volume, low-urgency categories like automated system notices), click Advanced Options during setup, and on the second page, check Mark It As Read alongside the move action.
Common mistake: People build these rules for one-off projects that will only last a few weeks, then forget to delete the rule afterward. Six months later, they have twelve dormant folder rules quietly running in the background, and nobody remembers what half of them are for. Review your rule list every quarter and retire anything tied to a closed project.
Rule 3: Turn Action-Required Emails Into Tasks Automatically
✓ Identical steps in Classic & New OutlookSome emails aren't informational, they're a to-do item wearing an email's clothing. A client request, an approval reminder, a "can you follow up on this" from a colleague. Left in your inbox, these get buried and forgotten. Flagged manually, they depend on you remembering to flag them.
This rule catches trigger phrases the moment an email lands, and turns it into a task automatically.
How to set it up:
- Go to the File tab and choose Manage Rules & Alerts.
- Click New Rule, and start from a blank rule for messages you receive.
- Add the condition with specific words in the subject, and enter phrases you see often, "action required," "to do," "follow up," or similar.
- For the action, choose Flag Message for Follow-Up, and set a start date or reminder that fits how you plan your day.
- Save the rule.
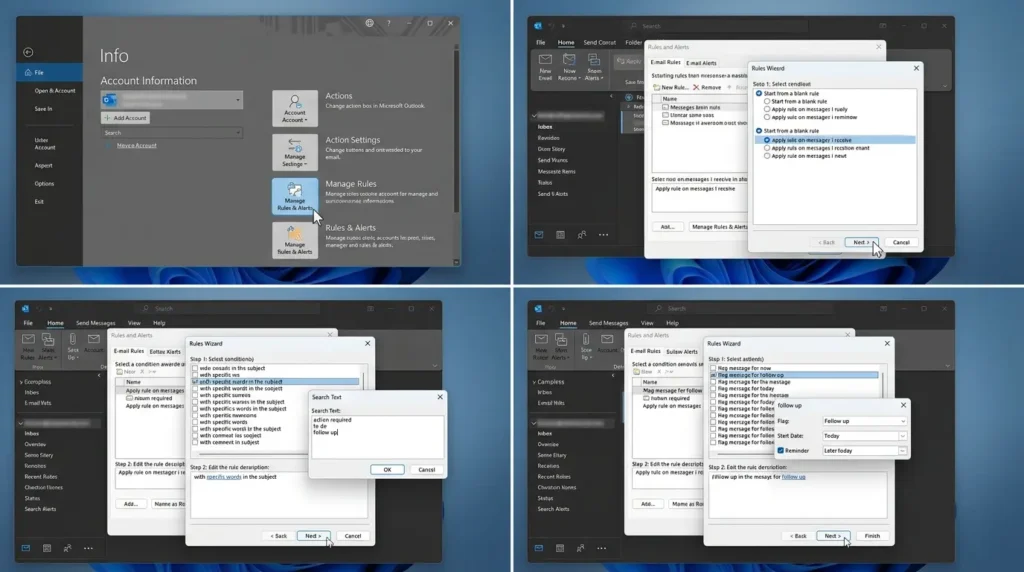
From that point on, matching messages are flagged for follow-up by the rule. Whether they appear in Microsoft To Do depends on the account and mailbox configuration. Microsoft documents Flagged email in To Do for Microsoft-hosted accounts and notes that only flagged messages from the primary mailbox sync; shared folders and shared mailboxes are not supported. The initial list also has a documented population limit of the 100 most recently flagged emails from the last 30 days.
Treat the flag as a triage signal, not as proof that every matching message has become a fully independent task. After enabling Flagged email in To Do, test one flagged message from the primary mailbox and confirm that the task opens the expected Outlook message.
If you plan your day from a task list rather than an inbox, this single rule closes the gap between "email arrived" and "task exists", with zero manual effort in between.
Rule 4: Stop Being the Forwarding Middleman
✓ Identical steps in Classic & New OutlookSome emails land in your inbox purely because you're "in the loop", a support ticket, a status update, a form submission, even though someone else is the one who actually needs to act on it. If you've ever manually forwarded the same type of email to the same colleague for the tenth time this month, this rule removes that entire category of work from your plate.
How to set it up:
- Go to the File tab and choose Manage Rules and Alerts.
- Click New Rule, and start from a blank rule for messages you receive.
- Set your condition. You can choose from people or public group (if it always comes from the same sender), with specific words in the subject (if there's a consistent keyword), or both, though note that if you select both, the email must match every condition for the rule to fire.
- Choose the action forward it to people or public group, and select the colleague or shared mailbox that should receive it.
- Skip the exceptions step unless you have one worth defining, a common example is excluding anything marked as Important, so genuinely urgent items still land in your own inbox instead of bypassing you entirely.
- Save the rule.
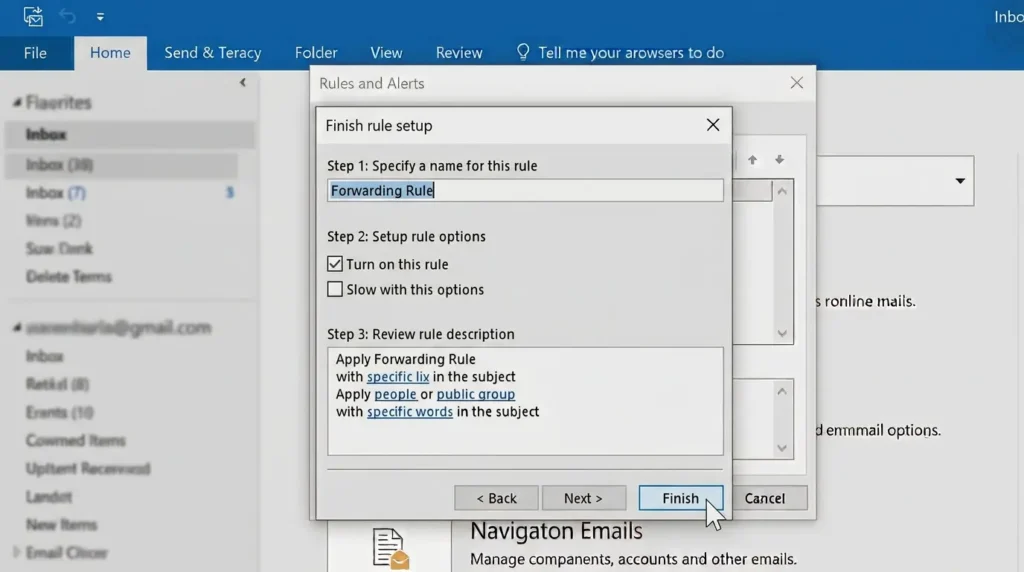
From then on, matching messages can be forwarded or redirected according to the rule you created. Microsoft distinguishes the two behaviors: a forwarded message appears to be forwarded from you, while a redirected message appears to come from the original sender.
Whether the original message remains visible, whether forwarding is permitted, and which later rules run can depend on the rule action, rule order, exceptions, account configuration, and organizational policy. Test the workflow with a non-sensitive message before using it for customer, HR, finance, or confidential correspondence.
Rule 5: Color-Code Your Inbox Into a Visual Map
⚙ Path differs by version — see note belowSometimes the goal isn't moving emails at all, it's knowing what an email is about without reading a single word of it. This is where conditional formatting does something genuinely different from folder rules: it changes appearance while keeping everything in the same place.
Assign finance emails green, marketing purple, anything urgent bold red, whatever grouping matches how you actually think about your work. The result is an inbox you can scan in a glance instead of reading line by line.
Reminder: this is the second of the two color-coding rules if you're on New Outlook or the web, use Settings > Mail > Conditional Formatting instead of the View tab path below, and expect font-color-only options.
How to set it up:
- Go to the View tab and click View Settings.
- Choose Conditional Formatting, click Add, and name the rule to match the group, "Finance," "Marketing," "Urgent."
- Click Font, and pick a distinct color and style.
- Click Condition, and set it to match, for example, all emails from a specific domain like @finance.com, or messages containing "urgent" in the subject line.
- Save.
| Category | Condition | Color |
|---|---|---|
| Finance | From @finance.com | Green |
| Marketing | From @marketing.com | Purple |
| Urgent | Subject contains "urgent" | Bold Red |
| VIP Contacts | From specific address | Deep Blue |
Rule 6: Never Lose a Meeting Invite Again
✓ Identical steps in Classic & New OutlookHigh email volume has a specific side effect: invites slip down the inbox before you've even opened them. One minute they're near the top, the next day they're buried under a dozen new threads, and that's exactly how meetings get missed. Moving invites into a dedicated folder solves this cleanly.
How to set it up:
- Open Rules from the Home tab, and choose Manage Rules and Alerts.
- Click New Rule, and start from a blank rule for messages you receive.
- Set the condition to which is a meeting invitation or update.
- Choose the action, move it to the specific folder.
- Leave exceptions blank unless you need one, and save.
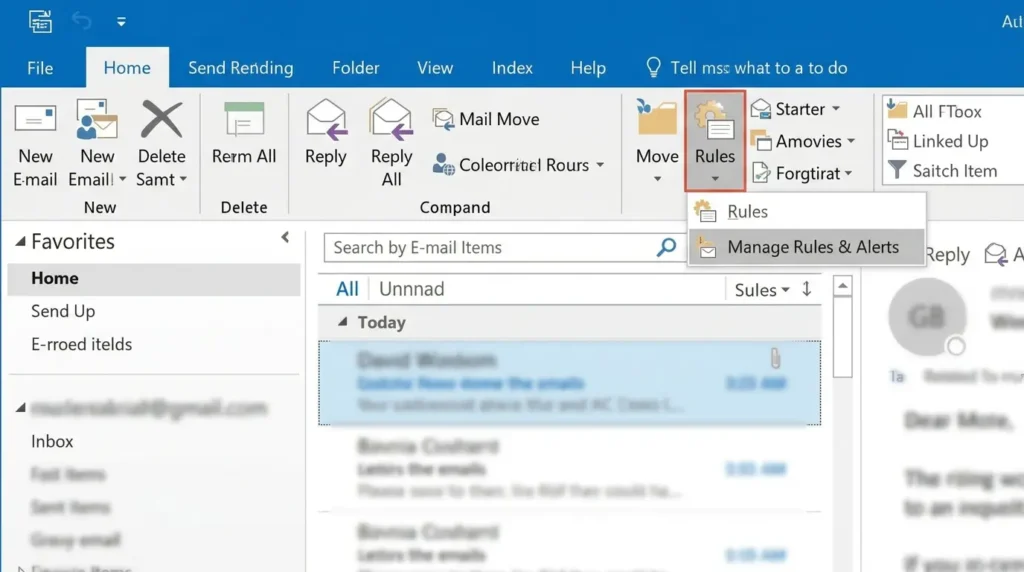
From then on, every invite and update goes straight into a dedicated, always-checkable spot, no more digging through unrelated threads to find out whether you accepted that Thursday sync.
Two Bonus Rules Worth Adding
Once the core six are running, two more small rules tend to pay off out of proportion to how simple they are.
The Unsubscribe Rule
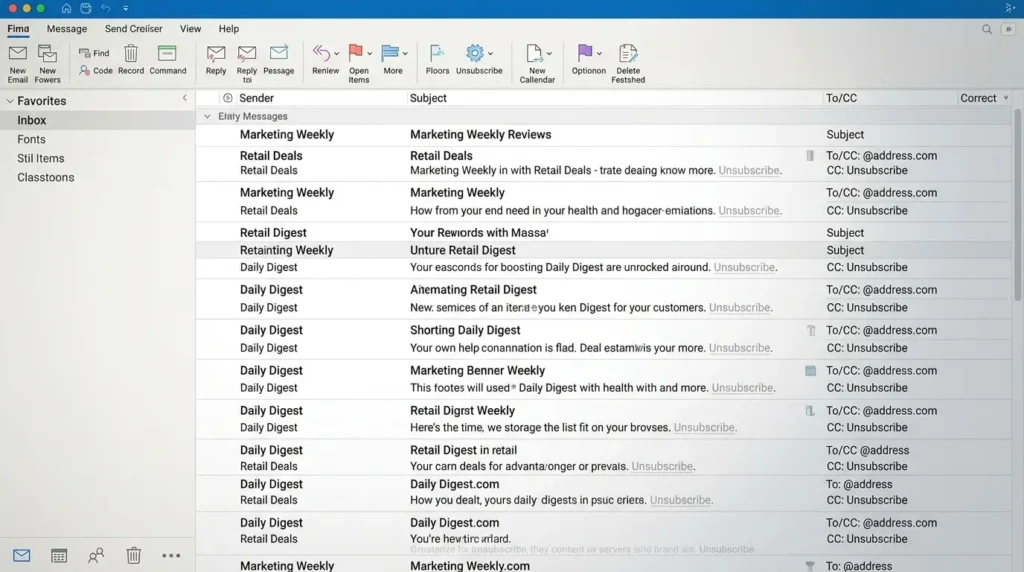
Newsletters and marketing emails almost always include the words "unsubscribe" or "email preferences" somewhere in the message. A single rule that moves anything containing those words into a separate folder clears a surprising amount of clutter out of your main inbox, no need to identify every sender individually, just the phrase they're all required to include.
A CC-Only Folder (used carefully)
You can also route anything where you're only CC'd (not directly addressed) into its own folder for later review, keeping your primary inbox reserved for messages sent directly to you. This one comes with a real caveat, though: it only works cleanly if the people emailing you actually use the To/CC distinction correctly. In practice, plenty of senders CC someone when they mean to request action from them, which means a genuinely important ask can end up sitting in your CC folder unread. If you use this rule, get in the habit of a quick daily skim of that folder rather than treating it as safe to ignore.
Quick Reference: All Six Rules at a Glance
| Rule | Type | Set Up Via |
|---|---|---|
| 1. Highlight VIP senders | Highlight | Conditional Formatting |
| 2. Auto-file project emails | File | Manage Rules & Alerts |
| 3. Flag emails as tasks | Track | Manage Rules & Alerts |
| 4. Auto-forward routine emails | Route | Manage Rules & Alerts |
| 5. Color-code by department | Highlight | Conditional Formatting |
| 6. Move meeting invites to a folder | File | Manage Rules & Alerts |
Notice the pattern, four of the six rules never touch conditional formatting at all, which means they behave identically whether you're on classic or New Outlook. Only Rules 1 and 5 need the version-specific approach covered above.
Want a Quick Desk Reference Guide?
Download the Outlook Automation Playbook (PDF) — a condensed cheat sheet containing all 6 rules, Copilot prompts, and setup checklists for quick access.
📄 Download Free PDF Playbook (Direct Download) ⚡ Instant PDF download — No email or sign-up required.Test every rule before trusting it
For any rule that moves, forwards, redirects, deletes, or flags mail, use a non-sensitive test message and verify the complete outcome. Check the triggering condition, the destination folder or recipient, the message’s read/unread state, the rule order, exceptions, and whether later rules still run.
Confirm the result in the Outlook client and account type that you will use in production. A successful test proves only that the rule worked under those conditions; it does not prove that every Outlook client or account will behave the same way.
Common Mistakes That Quietly Break Your Rules
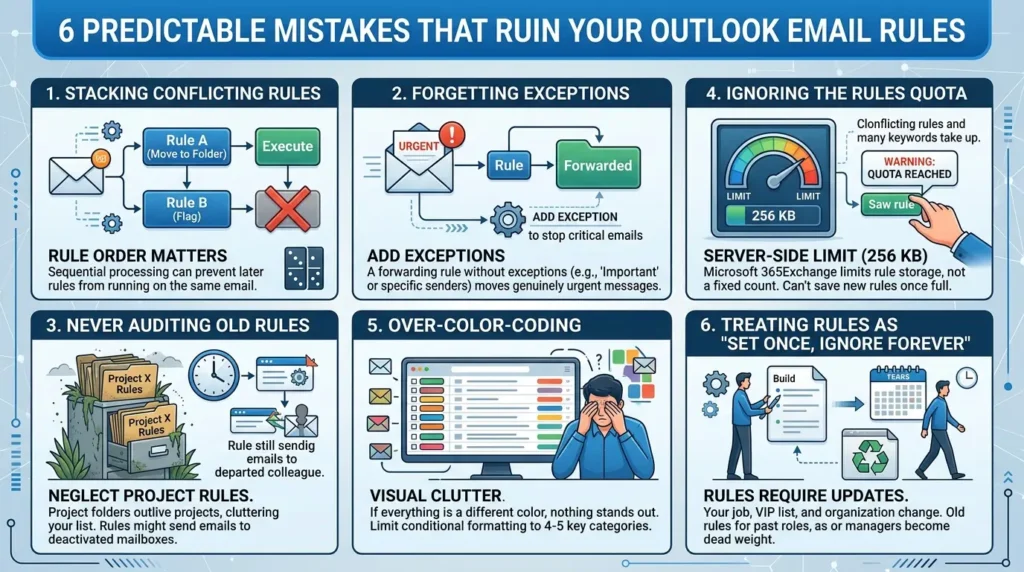
Building the rule is the easy part. Most people lose the benefit within a few months because of a handful of predictable mistakes:
Stacking conflicting rules
If two rules both act on the same email (one moves it, another flags it), Outlook processes them in order, and the first one to fire can prevent the second from ever running. Check your rule order under Manage Rules and Alerts if something isn't behaving as expected.
Forgetting to add exceptions
A forwarding rule with no exception for "Important" messages will happily forward something genuinely urgent straight past you. One exception clause fixes this permanently.
Never auditing old rules
Project-based folder rules are the biggest offenders here, they outlive the project itself and quietly clutter your rule list.
I learned this one the hard way. I had a forwarding rule running for eight months after the colleague it pointed to had left the company. Eight months of client requests, quietly vanishing into a deactivated mailbox. Nobody told me. The rule certainly didn’t.
Ignoring the rules quota until it’s a problem
Exchange Online documents a total Inbox-rules quota of up to 256 KB for enabled rules. The amount of space used depends on rule complexity, including the rule name, conditions, exceptions, and actions. Microsoft explicitly states that there is no maximum number of rules; the practical limit is the available rule-storage quota, not a universal count such as “80 to 100 rules.” When the quota is reached, Outlook warns that you cannot create new rules or update existing ones.
Keep rule names short, remove obsolete project rules, simplify repeated conditions where practical, and disable or delete rules that no longer serve a current workflow. If a mailbox reaches the quota, an administrator can review the Exchange Online rule-quota setting and the enabled-rule set.
Over-color-coding
If everything is a different color, nothing stands out. Limit conditional formatting to the four or five categories that genuinely matter, not every possible sender.
Treating rules as "set once, ignore forever."
Your job changes. Your VIP list changes. A rule built two years ago for a manager who's since moved teams is just dead weight.
Tools That Extend These Rules Even Further
Rules built through Manage Rules & Alerts and Conditional Formatting cover most of what a busy inbox needs. But Outlook has a few other built-in tools worth knowing about, for the cases that go beyond simple conditions.
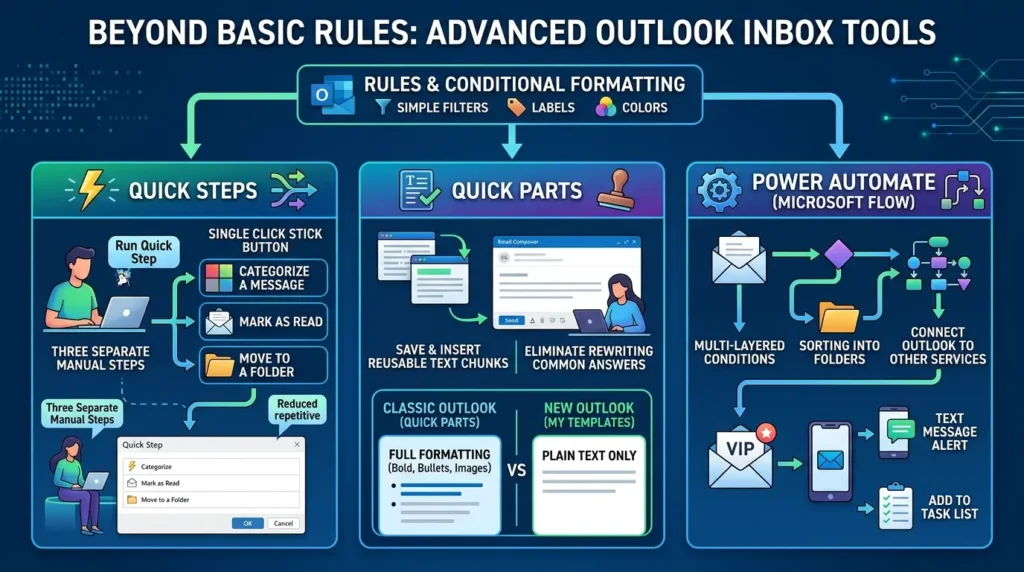
Quick Steps bundle several actions into a single click, categorize a message, mark it as read, and move it to a folder, all at once, instead of running that as three separate manual steps every time. If you find yourself doing the same three-click sequence on certain emails over and over, that's exactly the pattern a Quick Step is built to replace.
Quick Parts save chunks of text, or entire email templates, that you reuse constantly. If you answer the same handful of questions dozens of times a year, typing the same paragraph from scratch every time is wasted effort a saved Quick Part removes completely. One version note here too: this is a Classic Outlook feature at heart. New Outlook currently handles the same job through a feature called My Templates, which covers plain text well but strips out formatting like bold, bullets, or images, so if your saved snippets need to keep their formatting, Classic Outlook's Quick Parts is still the more complete option for now.
Power Automate (Microsoft Flow) picks up where Outlook's native rules stop being enough. Rules are limited to fairly simple, single-condition logic. Power Automate lets you build more elaborate workflows, sorting incoming mail into folders based on multiple layered conditions, or even sending a text message alert when a VIP email arrives, by connecting Outlook to other services entirely.
Section summary: Think of these as a second tier above the six rules, not something everyone needs, but worth knowing about the moment a situation outgrows what a simple rule can handle.
Measure the benefit instead of assuming it
The time saved by inbox rules depends on message volume, rule coverage, false positives, exceptions, and how often you open email. Rather than promising a universal result, measure your own baseline for five working days:
- Record the minutes spent triaging email each day.
- Count the messages moved, flagged, forwarded, or manually handled.
- Record false positives and important messages that were routed incorrectly.
- Create one rule, test it with non-critical messages, and repeat the measurement for another five working days.
- Keep the rule only if it reduces manual work without hiding messages that require attention.
This protocol produces a personal before-and-after result without presenting an unsupported benchmark as a general outcome.
Before and After: What Actually Changes
- 45+ minutes each morning triaging one long list
- VIP emails buried under newsletters
- Manually forwarding the same requests weekly
- Meeting invites missed under new messages
- To-dos forgotten inside old email threads
- Inbox pre-sorted before you open it
- VIP emails visually impossible to miss
- Routine forwards handled with zero clicks
- Dedicated, always-visible meetings folder
- Task list fills itself from flagged emails
How Much Time Is This Actually Worth?
It's easy to dismiss six small rules as a minor tweak. But small time savings, repeated daily, compound fast, the same way McKinsey's 28%-of-the-workweek figure adds up to 11-plus hours when you actually total it.
Use the calculator below with your own numbers to see what a realistic version of "hours saved per month" looks like for your specific inbox.
Manual Management vs. Rule-Based Automation
| Task | Manual Approach | Rule-Based Approach |
|---|---|---|
| Spotting VIP emails | Scan every subject line | Bold color, instant recognition |
| Filing project emails | Drag and drop each one | Auto-sorted on arrival |
| Creating tasks | Manually flag or re-type into a list | Auto-flagged, synced to To Do/Planner |
| Forwarding routine requests | Forward manually, every time | Bypasses your inbox entirely |
| Finding meeting invites | Scroll and search | Dedicated folder, always current |
Two Ways to Think About What "Organized" Even Means
Before the long-term maintenance side of this, it's worth acknowledging that not everyone agrees on what a well-run inbox should look like. Two philosophies show up constantly, and they pull in opposite directions.
Inbox as a to-do list
Some people deliberately leave messages unread until they've acted on them, using the unread count itself as a running task list. If this is you, it's worth turning off automatic "mark as read" behavior in your settings, otherwise the reminder disappears the moment you glance at a message, whether or not you've actually dealt with it.
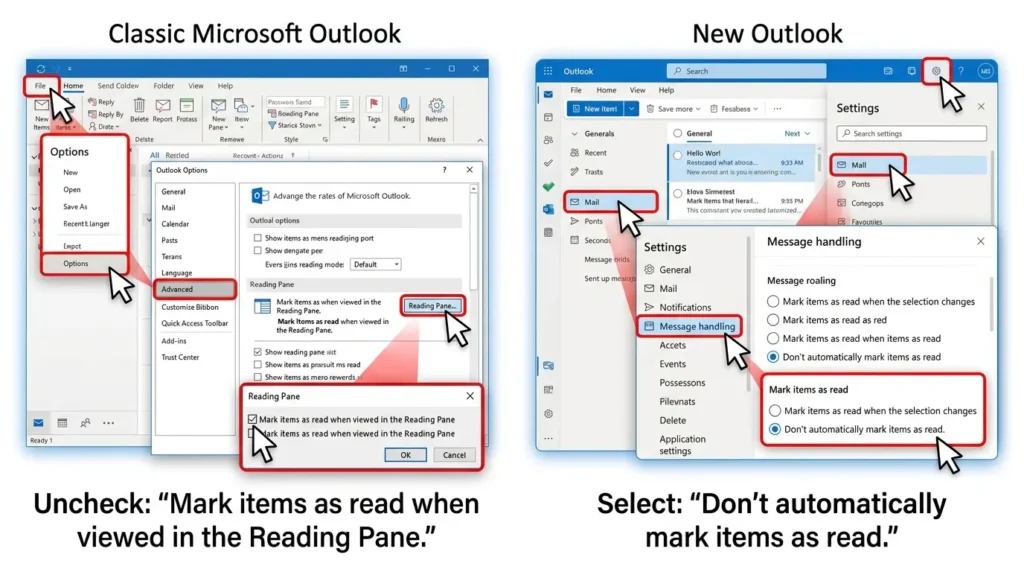
In Classic Outlook, that's File > Options > Advanced > Reading Pane, where you can uncheck "Mark items as read when viewed in the Reading Pane." In New Outlook and on the web, the same control lives under Settings > Mail > Message handling, where you can choose "Don't automatically mark items as read."
Inbox Zero, powered by search
Others process every message the moment it arrives, respond, delegate, archive, or turn it into a task, and end each day at zero. This group tends to skip building an elaborate folder structure entirely, betting instead that Outlook's search is strong enough to surface anything they need later. It usually is, though search quality is also the most common complaint from people who've tried this approach and found it patchy for older or oddly-worded messages.
Neither philosophy is objectively correct, and the six rules in this guide work fine under both. What matters is picking one on purpose, rather than drifting into a half-and-half system where nothing gets fully processed and nothing serves as a reliable reminder either.
The Details That Actually Matter Long-Term
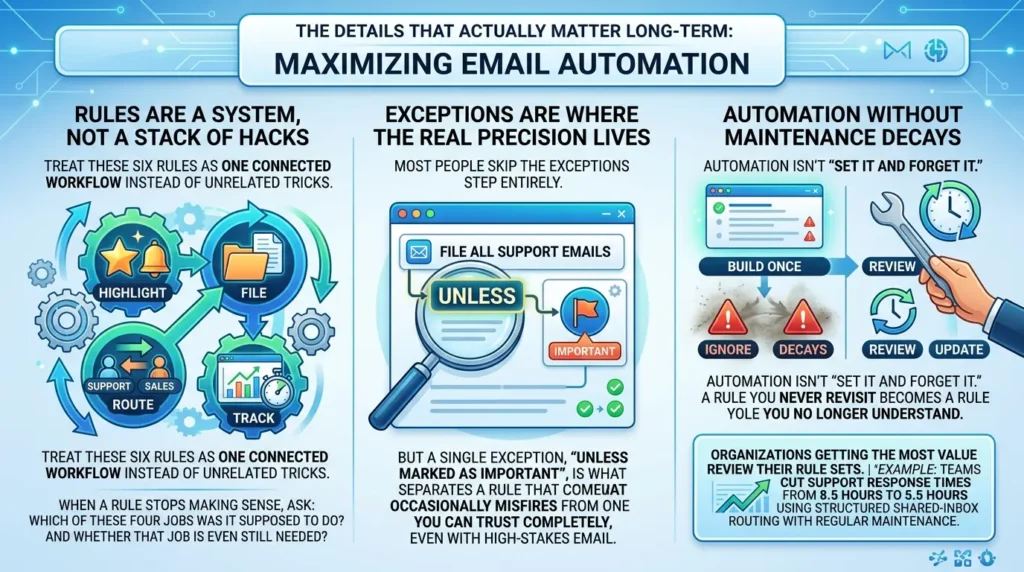
Rules are a system, not a stack of hacks
Treat these six rules as one connected workflow, highlight, file, route, track, instead of unrelated tricks. When a rule stops making sense, ask which of those four jobs it was supposed to do, and whether that job is even still needed.
Exceptions are where the real precision lives
Most people skip the exceptions step entirely. But a single exception, "unless marked as Important", is what separates a rule that occasionally misfires from one you can trust completely, even with high-stakes email.
Automation without maintenance decays
This is the contrarian point worth sitting with: automation isn't "set it and forget it." A rule you never revisit becomes a rule you no longer understand. The organizations getting the most value from automated inbox management, including teams that cut support response times from 8.5 hours to 5.5 hours using structured shared-inbox routing, treat their rule sets as something to review, not something to build once and ignore.
Where This Fits Into the Bigger Microsoft 365 Picture
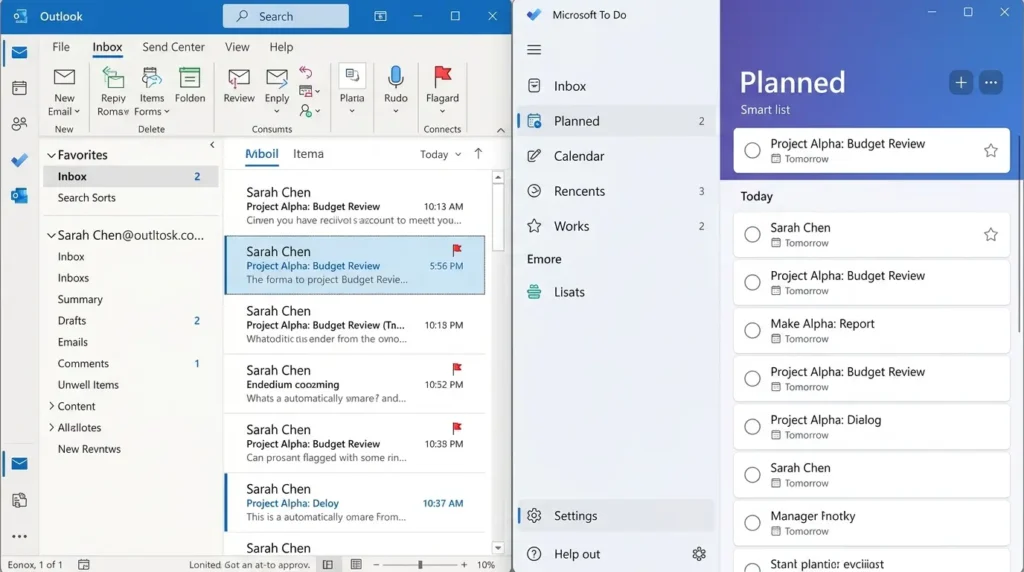
None of this lives in isolation. Flagged emails sync automatically into Microsoft To Do and Planner, meaning your task list is genuinely one system viewed from three different apps, not three separate lists you have to reconcile manually. If your team also uses OneNote for notes or Loop for collaborative documents, the same principle applies: the goal is always fewer places you have to check, not more tools stacked on top of each other.
For IT admins, the same Microsoft 365 ecosystem is also going through an authentication shift, Microsoft Entra is retiring SMS and voice MFA through 2027.
Adding an AI Layer: Using Microsoft Copilot in Outlook
Rules solve one kind of problem: repetitive, predictable decisions. But not every email fits a clean condition. Some threads are long, ambiguous, or need a written reply rather than a move-and-file action, and that's where Microsoft Copilot in Outlook picks up where rules leave off.
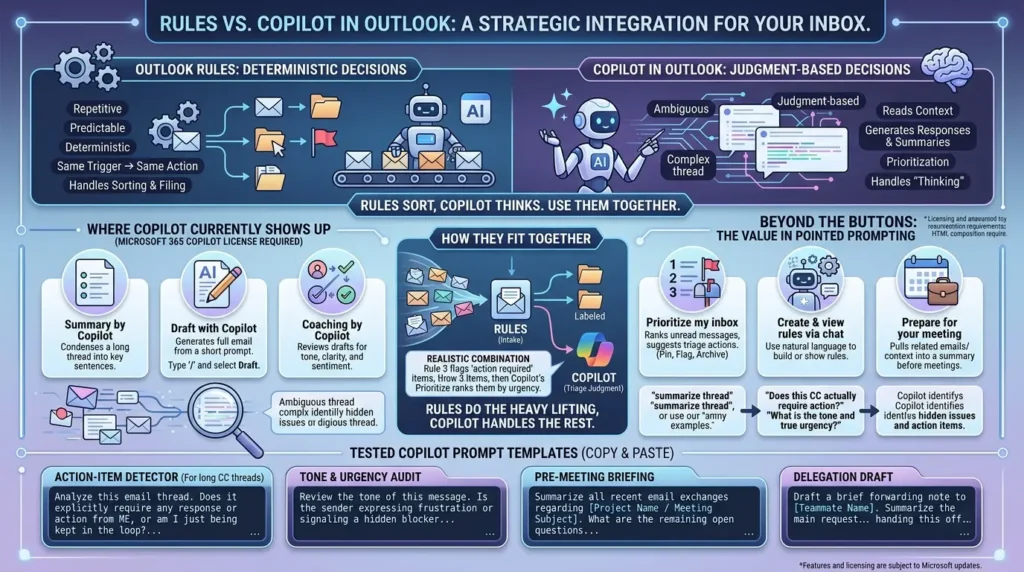
The distinction matters: rules are deterministic, the same trigger always produces the same action. Copilot is judgment-based, it reads context and generates a response, summary, or priority ranking that changes depending on what's actually in the message. Used together, rules handle the sorting and Copilot handles the thinking.
Copilot availability in Outlook depends on the account, client, organization settings, and license. Microsoft currently documents Copilot Chat in Outlook without an add-on license for some work or school accounts, including prompts that summarize email, draft an update, flag unread messages, and set an automatic reply. With a Microsoft Copilot add-on license, Microsoft documents richer interactions across inbox, calendar, meetings, chats, and enterprise data, including broader prioritization and context gathering.
Microsoft also documents a separate Outlook rule-management capability: Copilot can create, view, update, and delete standard Inbox rules using natural language. Copilot shows a summary and requests confirmation before making changes, and rules created this way apply to future incoming messages rather than retroactively changing existing mail.
The feature is documented across classic Outlook for Windows, new Outlook for Windows, Outlook on the web, Outlook for Mac, iOS, and Android, but availability can still depend on the account and rollout status.
Use Copilot as an assistive layer, not as an authority. Review suggested priorities, summaries, drafts, and rule conditions before accepting them, especially when messages contain confidential information, customer commitments, financial details, or security-sensitive instructions.
A realistic way to combine both: let Rule 3 (flag-for-follow-up) catch anything with "action required" in the subject, then use Prioritize my inbox to rank those flagged items by urgency before you sit down to answer them. That's rules doing the intake, and Copilot doing the triage judgment call on top.
One practical note: Copilot requires a Microsoft 365 Copilot license on your account. If the Copilot icon isn't showing up in your ribbon, that's usually a licensing or app-update issue your IT admin can resolve.
Beyond the built-in buttons, a lot of the real value comes from how you prompt it. Instead of just asking Copilot to summarize a thread, you can ask more pointed questions of the same content, things like "does this message actually require a response from me, or is it just a CC I'm being kept aware of," or "what's the tone of this email, and does it read as more urgent than the subject line suggests."
Used this way, Copilot starts doing something closer to triage than transcription: flagging the CC'd message that's quietly asking you for something, or catching the politely-worded email that's actually about a missed deadline.
The same approach works ahead of meetings and for delegation. Rather than a generic summary, you can ask Copilot to pull together every email relevant to a specific meeting on your calendar, or to draft a forwarding message that hands a request off to a teammate with the right context already attached, turning "let me write this from scratch" into "let me review and send."
Here are four prompts I’ve found consistently useful, each one mapped to a different inbox decision:
Notice the pattern: Prompt 1 does the same job as Rule 3 (flag for action), but for ambiguous threads where a keyword trigger wouldn’t catch it. That’s the handoff point, rules handle the predictable, Copilot handles the rest.
Rules remove the noise before it reaches you. Copilot helps you move faster through what's left. Together, they cover both halves of the problem, volume and judgment.
Not on Microsoft 365? Here's the Gmail Equivalent
Everything above is Outlook-specific, but the underlying logic, highlight, file, route, track, isn't. Gmail has its own version of nearly all of it, under the name Filters instead of Rules. Here's how the same six ideas map over:
| Outlook Rule | Gmail Equivalent |
|---|---|
| 1. VIP conditional formatting | Filter: "Star it" for the sender's address (color-coded highlighting isn't available, but starring achieves the same "impossible to miss" effect) |
| 2. Auto-file project emails | Filter: "Apply the label" + "Skip the Inbox" (Gmail uses labels instead of folders — an email can carry more than one) |
| 3. Flag as a task | No direct filter equivalent — star or label it, then add it to Google Tasks manually from the email's menu |
| 4. Auto-forward routine emails | Filter: "Forward it to" (the forwarding address has to be verified first, under Settings > Forwarding) |
| 5. Color-code by department | Assign each label its own color under label settings — the closest match to Outlook's conditional formatting |
| 6. Meeting invites to a folder | Filter on calendar-invite senders (or use Gmail's built-in "Skip the Inbox" for automated calendar notifications) + a dedicated label |
Gmail filters are created on a computer and can apply actions such as adding a label, archiving, deleting, starring, or automatically forwarding incoming mail. Google notes that a forwarding filter affects new messages, and that replies are filtered only when they meet the same search criteria. Gmail also documents filters for organizing certain calendar notifications.
The important difference is not simply “rules versus filters.” Outlook and Gmail use different account models, clients, task integrations, and administrative controls. Verify the behavior in the account you actually use, and do not infer server-side guarantees or quota differences from the interface alone.
Review boundary for Copilot
Copilot can summarize, draft, prioritize, and help manage rules, but its output is not a substitute for checking the original message. Review the source thread, recipients, attachments, proposed rule conditions, and any generated wording before you accept a change or send a reply. Use deterministic Outlook rules for predictable routing and use Copilot for context-dependent work that still receives human review.
The Bottom Line
Three months in, my morning inbox routine went from 45 minutes of scrolling to about eight minutes of acting on what actually matters. The inbox itself doesn't get smaller, but the portion of it that actually needs your brain gets dramatically more manageable.
Start with just one rule this week, the VIP highlight or the meeting-invite folder tend to have the fastest, most noticeable payoff, and build from there. The goal was never a perfectly organized inbox. It was getting your attention back for the work that actually needs it.
FAQ
Do these rules work in both desktop Outlook and Outlook on the web?
Many standard Inbox-rule scenarios are available across supported Outlook clients, but behavior is not identical in every case. Microsoft notes that some rules created in classic Outlook are client-side and cannot be processed by new Outlook. Check the rule in the client and account where you plan to rely on it, then test it with a non-critical message. [1]
Will these rules also apply to emails I already have in my inbox?
By default, a newly created rule applies to incoming messages. Microsoft documents a separate option for running an Inbox rule on existing messages in new Outlook. Check the exact option shown in your client before assuming that a rule has processed older mail. [1]
Can I combine several conditions in a single rule?
Yes. Outlook rules can include multiple conditions, actions, and exceptions, but the exact options depend on the Outlook client and account. When you combine conditions, test a representative message to confirm that the rule triggers only when the intended criteria are met. [1]
What happens if two of my rules both apply to the same email?
Rule order matters. Microsoft documents that Inbox rules are applied according to their order in the Rules list, and Outlook also supports a “Stop processing more rules” option. Reorder and test rules when one action changes where a message goes or whether later rules can still act on it. [1] [3]
Do I need admin permissions to set up any of these rules?
Requirements depend on the account, client, subscription, and organization policy. Microsoft documents conditional formatting for work or school accounts with a qualifying Microsoft 365 subscription. Forwarding may also be restricted by organizational settings. If a feature or recipient is unavailable, check the account administrator’s policy rather than assuming that every standard user has the same capabilities. [2] [6]
Do flagged emails automatically become Microsoft To Do and Planner tasks?
Flagging an email can make it appear in Microsoft To Do when Flagged email is enabled and the account and mailbox meet Microsoft’s requirements. Microsoft notes that only flagged messages from the primary mailbox sync, while shared folders and shared mailboxes are not supported. Do not describe this as identical synchronization with Planner without a separate, current source for the specific Planner workflow. [8]
Do I need Copilot, or are the six rules enough on their own?
The native rule workflow and Copilot are separate capabilities. Microsoft documents some Copilot Chat actions in Outlook without an add-on license for eligible work or school accounts, while richer context and enterprise-data interactions depend on an add-on license and organization setup. The availability of conditional formatting also has its own qualifying-subscription requirement. Check the current Microsoft documentation for the account and client you use. [2] [4]
Can I create or manage Outlook rules from my phone?
The native Outlook Rules settings experience is more limited on mobile than on desktop and the web. Microsoft currently documents creating, viewing, updating, and deleting standard Inbox rules with Copilot on iOS and Android, while the native Rules settings link is not available there. Use Outlook on the web or desktop when you need the full Rules settings page, and test the result with a non-critical message. [7]
📋 Article Timeline & History
Successfully updated on September 24, 2026 with the latest details.
This article was originally published on July 22, 2026.

Was this article helpful?




[…] I Stopped Managing My Inbox. Here’s the 6-Rule Outlook Setup That Manages It For Me […]